
So far, there are only boys in my family, so when faced with several approaching baby showers for female babies, my mom and I were only too overjoyed to experiment with making barrettes and headbands. We wanted to make Baby Hair Barrettes with newborns and infants in mind, so we experimented with several different styles, sizes, and hair-clipping methods.

First off, we hit up our favorite local craft thrift store (if you like crafting and you are ever in Portland, OR, I highly suggest scheduling in a trip to Knittn’ Kitten!) and gathered supplies for making wee barrettes.

Baby Hair Barrettes Tutorial
Craft supplies we picked up:
- ribbon of different widths and styles
- buttons
- lace
- a package of 1″ yo-yos (you’ll need to make your own or find them at a thrift store or garage sale, or grandma’s sewing room!)

We also picked up some additional supplies. You can find these at your local big-box warehouse department store, craft store, dollar store, or drug store.
Additional supplies:
- mini barrettes (also called “snap pins“)
- Velcro-type round closures
- elastic
- needle & thread
Unsure of what kind of barrette would work best in baby-fine hair, we experimented with several styles (well, actually, my mom did all the experimenting!) such as:

The Classic Clippie
Way, way back in the 1980s, my mom made “clippies” for my sister and I in a similar style to these pink ones.
To make:
Take a length of lace and gather it on the hemming edge, into a rosette. Tighten the thread and tie off. Add a ribbon bow and a cute button. Attach securely to clip.

These turned out really cute, but they were kind of big for a newborn or infant (about 1-1/2″ in diameter). They’d probably be better for a toddler. See the clippie “in action” above in my pre-schooler’s* hair.
So, the revised infant-sized version was made:

For the small clippie, just a 1/2″ piece of ribbon was gathered into a rosette and embellished with a cute button, then attached to the clip. Here you can see the type of clip we used, and the method of attaching the embellishment. Because these are intended for small babies, we secured the ribbon to the clip with thread instead of a hot glue gun, with the idea that it would be harder for the baby to pop the ribbon off the barrette if it was sewn on.
The Velcro Barrette

Another method we used that we think would be great for wispy baby hair is the Velcro “barrette.” We made lightweight embellishments (these Hello Kitty ones were made using a pre-made “bow” cutout and a shank button) and sewed them to small 1/2″ round Velcro pieces.

This version of the Velcro barrette looks like a kimono to me!

To put this barrette on baby, just remove the back of the Velcro round, place under small amount of hair, and attach front of barrette to back of barrette, with hair flowing through the Velcro. This is very lightweight and doesn’t pull the baby’s hair, but stays secure.

My toddler wasn’t available at photo shoot time! We did test it on his* hair, though (still baby wispy-fine), and the Velcro worked very well.
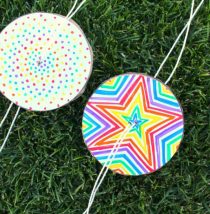
The Snap Tape Barrette

Another barrette method we tried was using snap tape. How do you use it? Snap it into baby’s hair – hair is caught between both sides of the tape and stays secure. It seemed to work well, but is harder to remove. That might be a good thing if you have a grabby girl!

For the snap tape barrettes, we used the mini yo-yos with ribbon and shank buttons, and they looked really cute! We sewed the snap tape to the yo-yo. The pre-made yo-yos we had were bold colors, but you can make yo-yos in any color you want, and they sure are sweet! These ones are about an inch in diameter.

Here’s another yo-yo barrette shot because I like the Hello Kitty buttons! :)
Magnet Barrette Fail

Not all of our experiments were successful. For instance, we tried to make a “barrette” out of sheet magnet, thinking maybe we could make the magnet stick to itself with hair between the pieces of magnet. With standard thin/weak magnet sheet, this didn’t work well. It did actually stay in the hair, but just not to our satisfaction. It might be worth experimenting with further if slightly stronger magnets were used.
Send this barrette to CraftFail.
And on to the headbands. We made a couple styles:

Lace and Velcro Headband
One headband was made with a length of lace that fits around baby’s head, and secured with a couple pieces of velcro. The bow-style, which we think is so sweet, takes very narrow ribbon and makes a loopy bow, secured with a pretty button.

The lace and velcro headband stays put very well, and looks super cute.
The Elasticized Ribbon Headband

To make this headband, sew two pieces of ribbon together on long edges, leaving a small opening (an inch or so) to run elastic through. Put a safety pin on the end of a piece of elastic and run it through the ribbon casing to create the headband. Attach desired adornment. For this headband we used grosgrain ribbon for the headband and pretty sheer ribbon for the loopy bow.

We also tried the same method with bias tape for the headband. It worked fine as well (and you only have to sew it on one side). I like the lace and narrow ribbon loopy bow on it! And don’t you love those pretty rhinestone buttons?
This style of headband seems to work well, too, but we didn’t give it the “church service test” to see if it stays on for longer than five minutes! Please let us know how yours works for you!

*Thanks to my sons for being my guinea pigs! :)
And thanks to my mom for doing all the hard work!
Warning/Disclaimer: Please watch baby if you make these – she might put them in her mouth!


Wow, thank you so much for sharing your ideas. Do you know where to find the velcro type clips? Again, thank you!
Thank you so much for sharing this! I was just about to run to the craft store to find some supplies for making little headbands and bows for my little girl, and this gave me a lot of good ideas and inspiration. Thanks!
I feel so inspired!!
Those hello kitty ones are the cutest!
Thanks so much for this post. Just this morning I started fooling around with trying to make some tiny bows for my baby girl (arriving in a few weeks) and was getting frustrated with trying to fold & tie ribbon into tiny bows and attach to tiny bits of velcro. Very hard to do and to stitch! Will definitely look around for those clippie barrettes and try some of your techniques. Have been looking for info like this for a long time!!
You have got lots of beautiful collection of toddler crafts here. I love to see them. They look cute and worthy buying for the little kids at home. Thanks. Toddler Crafts Julie.
Wow, that’s a lot of work you’ve done. Thanks for the report. We were hoping to make some hair bows this week!
Just so happens that I am heading all the way to Portland (I live in MD) next week for business. I will have a little extra time and can’t wait to check out Knittn Kitten!! Looks like it RIGHT up my alley! Thanks for the suggestion. Love to find new places when traveling. Makes it worthwhile. Will have to bring a big suitcase. :)
WOW! That’s a lot of hair clips!
My daughter was born with a very thick headful of long hair. Baby barretts didn’t work. We had to use clips or hair ties. She is nearly three and her hair is to her waist. I wasn’t as creative as I could have been when she was little.
Cute for the little ones with little hair. I linked at somedaycrafts.blogspot.com
I love barrettes but my daughter’s hair is getting so thick that those little ones won’t work anymore. These are all so cute!!! I usually make them as gifts since I still have so many supplies left. I trying some of these :)