I have recently been introduced to the world of Etching by my neighbor Lorinda. You etch your name or a shape onto glass. It shows up faded and fancy with a beautiful image. Then when you give your neighbor a casserole, your glass pan will already have your name on it, instead of having to use your name on masking tape at the bottom of the dish!

Etched Glass Pans
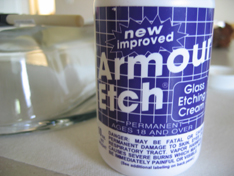
Supplies for Etching:
Etching is not as hard as it may seem. You just need a few tools and you’ve got it. Most of the supplies can be found at your local craft store. I love Roberts and their 40% off coupons.
- One bottle Etching cream – at least 30 glass pans done with 1 bottle.
- one sponge brush – any size.
- stencil of image – vinyl images work best to avoid cream seeping. Contact paper can be used as well, but the image is flimsy. Try to find someone who sells vinyl lettering.
- masking tape – to help the cream not get where you don’t want it to.
- glass – any type of glass will do, even mirrors can be etched.
Instructions:
This example is made with contact paper. I drew the letter, then cut out the mirrored image. I only did one large letter because contact paper is flimsy and a whole last name would be difficult. Next, clean your glass and lay it upside down. Peel the backing and lay the image carefully in the place you want it. Make sure it is pressed tight in all areas. Don’t worry about the company name on the bottom of glass pans, the etching will show through. Try to get glass that has the littlest image of the company name.

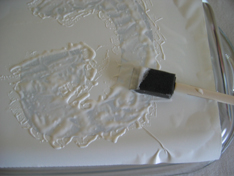
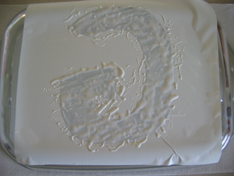
Then dip your brush into the etching cream and dab it on to the clear glass image. You don’t need to do it to thick, but don’t be shy either. Try as best as you can to get the cream even.
Now just wait for 6-8 minutes for it to set. Then put on rubber gloves and run the pan under the sink faucet to wash away excess. You don’t need to scrub, just rub off the cream.
Next, dry off the glass and take off the stencil. MAGIC. You think it didn’t work until you take off the stencil and then it is amazing what it looks like.
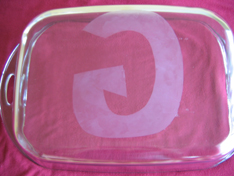
These personalized pans can be made and given for almost any present. Great for Moms, Birthdays, Weddings. One bride said that it was one of her favorite gifts that they got. This one was for my sister’s birthday.


Etched glass studio in Florida, Chris Sommer specializes in glass etching, creating etched art glass, air brushed carved glass, illuminated glass, carved stone and other sculptures from glass. We can put designs on etched mirrors, painted glass and also sell glass paint.
This is awesome! Can’t wait to try it!
I made some of these for Christmas gifts….pie plates w/pics of steaming hot pies! I happened to do what Kathy suggests.
I found an image online that I liked, enlarged & printed it. Then I traced it w/a sharpie onto the contact paper. Stuck it on the bottom of the plate and then cut w/exacto blade. Very easy.
I found clear contact paper at Big Lots for $2 a big roll, so I’ve got lots more etching in my future!
Another idea…use your cricut machine to cut out shapes and words for etching. I did this using contact paper and it turned out great! Walmart sells glass plates individually for about $1 each and I used them to make some neighbor gifts.
GG – Contact paper is Shelf Liner found in the housewares section of most grocery stores. I bought mine at Walmart in their kitchen wares section.
Nice one! i have been trying to find contact paper and all the stores look at me like i am speaking alien language when i say ‘contact paper’. where can i find it and how much does it cost approx?
THanks,
G
I love this idea for a easy gift awesome !!! Thank you for sharing & a wonderful tutorial!
We did this for a Relief Society enrichment night and it was a hit! We had Signtech (801-364-7446) cut all of our stencils from vinyl for $3.50 per name. They did a great job and made it easy for us. We did last names on the top portion of the dish about 1 1/4″ high, and a design on the bottom. We gave the choice of tulips or trees. They turned out beautifully! Here’s a heads-up on one thing: a problem we ran into was that our older pyrex-type casserole dishes would not etch for some reason. All of the brand new ones etched perfectly, and some of the gently-used ones etched worked. Even if we left the cream on the old ones for 45 minutes, they wouldn’t not etch. Thanks for the tip of scraping the cream off and putting it back into the jar. That worked well for us too. we did about 160 dishes with 4 jars of cream.
Remove backing from Contact piece. Apply to dish bottom. Draw pattern on it. Use X-acto knife to cut out pattern (remember to reverse letters or other directional motifs). Remove areas to be etched. Rub around edges of pattern to make sure it’s sticking tightly to the glass so etching cream doesn’t seep under it. Apply etching cream. Wash off. Remove Contact.
By having the Contact already on glass when you cut it, the design can be quite intricate.
When we did this at a super saturday event, the gal had us scrape the etching creme back into the jar to be re-used!
great idea!
We do high definition etching on glass and mirror, but you have a great idea that we might offer. We aren’t able to do the round glasses yet, but maybe someday if we get a laser.
Thank you.
Mark
What a wonderful idea…etch your initial in a pie or cake plate and never loose it at a potluck dinner!