We’re making a handmade plantable greeting card, where the flower seeds are mixed right in with the paper. When it is planted in the ground and given lots of TLC, it will bloom into beautiful flowers you can enjoy! It’s such a satisfying craft to make that keeps on giving and giving!

Handmade Greeting Cards You Can Plant
I’m sure all your friends and family would love to receive this card in the mail, such a fun gift to get! Here is a tutorial for a project using seed paper.
Supplies:
- craft or art paper
- blender
- water – enough to cover the paper inside the blender
- flower seeds
- stirring spoon
- colander or cloth towel
- piece of felt
- white paper card folded
- glue or tape
- pens or colored pencils
Instructions:
First, you need to make the paper.

Use paper you have around your house. This is a great way to recycle old scraps. Tear them up into small pieces and place in a blender. Add enough water in the blender so the paper is covered and blend.

When your paper is nice and evenly blended you can add your seeds. Unplug your blender and use a wooden spoon to gently stir the seeds into the paper mush. Do not blend them!

Now it is ready to be shaped. Place a colander in the sink and pour the paper mush into it. If you have large holes in your colander like I do, go ahead and place a towel in it to catch the pulp, but not the water.

Place a towel on the counter and if you have a piece of felt, place the felt on top of the towel. Then gently pour your seeds and paper pulp on the felt and spread evenly out.


Take another towel and press it down on the paper pulp to help dry the excess water. You can now blow dry the paper or let it sit out overnight to dry.

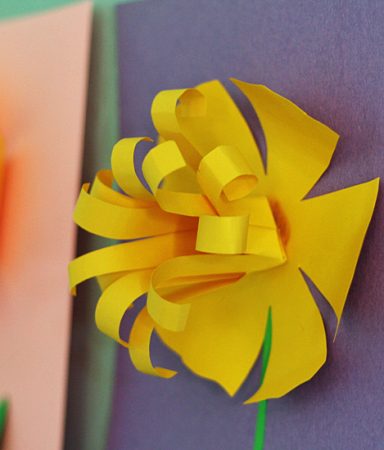
When your paper is dry, cut it out into a flower shape. Make a simple card with cardstock and glue the flower to your card. Feel free to get creative here and draw, stamp, or cut out a stem. If you don’t like flowers, make a cute butterfly or tree. The options are endless and no matter what shape you choose–it will be a hit with the recipient of the card.

You’re done and your flower seed card is ready to plant! Make sure you add a message somewhere on your card to let the recipient know they can plant it!


Hello to all, how is all, I think every one is getting more from this website, and your views
are pleasant designed for new viewers.
that’s a really cool idea and a surprising gift!
I linked to your tutorial on my blog – thanks for sharing!
?, doro von Hand zu Hand
I think what you published was actually very logical.
But, what about this? suppose you added a little content?
I ain’t saying your content isn’t solid, however what if you added a post title that makes people desire more?
I mean Bloomin’ Handmade Greeting Cards You Can Plant – Make and Takes is a little plain. You ought to peek at Yahoo’s home
page and note how they create post titles to get people interested.
You might try adding a video or a picture or two to grab people excited about everything’ve got to say. In my opinion, it might make your posts a little bit more interesting.
Although some charge card fees are disguised well,
it is very important to read the agreement thoroughly and check
all the costs before signing anything. This is no different with balance transfer charge card
accounts.
These are in fact great ideas in on the topic of blogging.
You have touched some nice factors here. Any way keep up wrinting.
1. If you encourage your visitors to write their original reviews about your products instead of coping reviews from competitive websites to show you have circulation and satisfied customers,
your website is more likely to earn higher ranking in the major search engines.
This is what professionals do. The only thing that cannot be “fixed” later is your blog
and post titles. Organic SEO uses valid and safe techniques to
rank your site for its keyword. Examine in detail the shift in the customers’ rank, and progress in their positions. Domain Authority is influenced by:. This means that they follow only the steps given to them by Google and other major search engines. Moreover, some companies are not able to get the desired results and their techniques might even have bad effects on the business’s website.
Numerous SEO services over competitive price for outsourcing your site online,
but, would it be best to hire the locals if the nature of your business limits to your local as well.
The final way that you can use your Deviant – ART profile for SEO purposes is by being an active member of
the community ‘ watch the work of others (especially if they are related to your business), encourage others to watch your work, comment on work, list other users as your friends. If your website deals with certain products or services, then conduct a proper research on these and then form your SEO content. Moving your hosting to a nearby country such as Canada or an offshore Caribbean host may provide the same latency times, but reduce the risk of having your website brought down by a mistake. No – you name some of your images “breast. Learn from other people’s mistakes and experiences
rather than destroying your own skills and wasting your time on experiments.
It has been designed especially for business purposes
and it holds biggest importance for your B2B online marketing
strategy. In fact, soon, not using RDFa could put a site at a disadvantage.
However with passing time the complexity in this field has
increased and performing an SEO task is not a
simple thing to do. The internet has become an integral part
of our lives that according to the latest statistics, almost 1 billion Americans access the internet.
com is one of the premier portals on the World Wide
Web which has been formulated with the intention of providing SEO Hosting
options for webmasters around the world who seek a way to ensure that their websites reach the top ranks of all major search engines.
If you are using firewall software such as Outpost Firewall Pro, the
paid edition of Online Armor and Kaspersky Internet
Security or PURE, you can take advantage of using their Blocklist feature that will
block connections to known malicious URL and IP addresses.
This means you tend to be copying it through file sharing websites like rapidshare,
megaupload, hotfile, etcetera. Content, keywords and link building are some of the factors
using which Search Engine Optimization services are taken care of.
While you’re at it, remove all or fix 404 errors. It’s so important because once customers begin seeking your product or service you will want to have favorable words making your search results optimized. Search engines are getting smarter at detecting sites that are spamming keywords or made solely for the purpose of advertising. Since keyword analysis is needed for both SEO (search engine optimization) and SEM, we often confuse using these terms. When SEO services are working for you, you should always be ready to capitalise on innovations and fresh marketing opportunities. Make buying easy for the customer and they will return often. This helps auto dealership websites rank higher in the search engines results and get more traffic to the website. They want to know things about how to create effective copy, general marketing tips and maybe even stuff about social media. If your website deals with certain products or services, then conduct a proper research on these and then form your SEO content. The SEO agencies must take care of the fact that the traffic is getting converted to potential customers. You can Google maps link for your website, which will be very helpful if any person search in images sections. And, as more and more companies move larger portions of their advertising budgets to internet marketing, there is an even greater demand for their skills. It has been designed especially for business purposes and it holds biggest importance for your B2B online marketing strategy. Have you been looking at your competitor’s websites to see what kind
of keywords they’re using. You will not even get to a 1 or 2 until Google has fully crawled your website or blog enough to give it a ranking. Such companies know the best about industry and market trends. SEO requires understanding of various algorithms.
Love this! thanks for sharing!!
Hi, does it work with tissue paper anyway I love the idea thanks so much
These cards look awesome. I posted it on my facebook page! Thanks for sharing!
http://www.facebook.com/pages/Guatemala-Greetings/300199273342757
Such a cute idea!
Very cute! Good plan.
AMAZING! Thank you!!!!
I just recently purchased some handmade plantable paper for favors I’m making. (didn’t think of making it myself…) Now I’m trying to cut them into shapes using hole punches and having the hardest time… I’m wondering what was used to cut out flower shape. Any help would be greatly appreciated… I’m on my 3 hole punch! :)
I bought a neat looking seed card at a farmers market in Washington state. The entire card had seeds in it (not just a portion glued to the card stock). My friend planted the card but only one small flower made it up ) : Later I wondered if they may have transplanted it from somewhere else to make me feel better ( :
You could probably start your own store @ http://www.zahoomi.com/stores and sell them online….
Wow! Just in time for Mother’s Day! I hope to make many of these and give them to all my family and friends who are moms. Maybe my daughter will help, also. Reading the comments also inspired me. People want to use these as wedding favors, party invitations, day care projects, teen projects, etc. How cool!
For friends who are not moms, I can make “Thinking of You” cards. This is such a great, simple, thoughtful project. Thank you, thank you, thank you!!!
Idea gradevole,facile e romantica.I semi sono vita e regalare un inizio di vita è bellissimo.Ciao-Chicchina
I love this idea! Those are beautifulinvitations. Im going to make them for my son’s 3rd birthday party! Thanks for the great tip!
My fiance and I have been trying to find the perfect wedding favors. I came across this site and I am so glad I did. We will definately be making these for favors. Thanks!
I love the idea.
And even better you share this
with a great tutorial.
Thanks!!!!
Aanee xxxx
What an awesome gift idea!!! I have purchased seed cards and will now have to make my own! Thanks!
How eco-fabulous! love it!
Have you had any problems with the seed sprouting from the moisture in the paper? Can you use any type of seed?
I love this! I might try it myself on my next day off. If i do, may i post it on my blog
? peachytease.blogspot.com. I’m new to this and find blogging very relaxing.
Great!! .. kool and kreative :)
I love it. My 4 year old will have so much fun doing this. Thanks.
it’d be nice to see pictures of bloomed flowers
that is incredible, I love it
so you just stick the whole piece of homemade paper in the ground?
honest question: isn’t the paper bad to plant?
I love plantable cards! My husband and I gave out plantable favors at our wedding last year, but then when planting season came around this year I forgot to put any in the ground! oops! I think I’ll try a few this weekend and see if anything comes of it :)
Stumbled Upon….No Way! This Is So Cool. :) Can’t Wait To Try It.
I love it! I am adding this to my crafts round up.
Great Idea !! I already saw it in some shop…but didn’t know I could make it myself too !
Does wetting the seed in the paper not cause it to germinate too soon?
has anyone actually seen this grow into blooms?
luv it~!!!!
Cool idea, my daughter will be excited to try such a project.
Amazing! thanks for share
What a wonderful idea! I’m going to try this!
Such a great gift idea! I posted a link to it on my blog: http://ificould-ificould.blogspot.com/2010/03/bloomin-handmade-cards.html
Missy (SHS)
What a great idea for people who have a green thumb. I’ll definitely be sharing this with my readers!
I (14) made this for my mother for Mother’s Day, just this morning with no prior experience of making paper. She loved it. I dried it using a hairdryer and a blow heater, on a homemade stand. The drying took an hour that way. I also coloured the paper using food dye, but this will likely ruin the towel you are using to dry it on. Thank you very much!
Be sure to let you recipient know how deep they should plant their greeting card (and seeds). Most seeds don’t go deeper than 1/2 inch, but a lot of seeds are planted at 1/4 or 1/8 of an inch.
What a great idea!! Thank you so much:) xoxo
Wooh! My momma’s birthday is coming up, and I’m really excited about this!
Wonderful idea. Thanks for sharing itl
These are so cute! I’ve posted them in a diy thank you note roundup on my blog, The Handmade Experiment – http://emilyflippinmaruna.wordpress.com/2010/03/09/thank-you/.
Thanks!
Emily
I have seen this and was thinking about doing it. It such a neat idea and perfect for family and friends far away. Thanks for the great tutorial.
I stumbled upon this site and was so smitten with this project! I work in administration at a private school and we’re close to Mother’s Day projects. GREAT PROJECT!
I am going to try this; it looks like a lot of fun and not too hard…!!
I have a daycare so i really excited to have them do this craft, and
give their cards to their parents.
Awesome! Thanks for sharing the idea and giving the steps. It’s a perfect almost-Spring time project!
I’ve seen some cards like this before and wondered how it was done – now it seems so obvious! Clear instructions and good photos make this a very doable project. Very cute – thanks!
This is a great idea. I know just what card will now accompany my sister’s birthday gifts this year! Are there any particular types of flower seeds that work better than others for this project?
Wow, I can’t wait to do this project! Thanks! :)
I’m pretty excited about this project. What a fun spring time card. I can think of a handful of people who would love to get this card (myself included). Plus it’ll be a fun project to have my kids help with. Thanks for the fantastic idea!!!
I love it! I want to send them to everyone now! Thank you!
I. LoVe. ThIs!!
What a fun project. I’ve never made paper. My kids will love this! And I’ve got just the person to give this card too.
Awesome!!!
What a great idea. Love it!