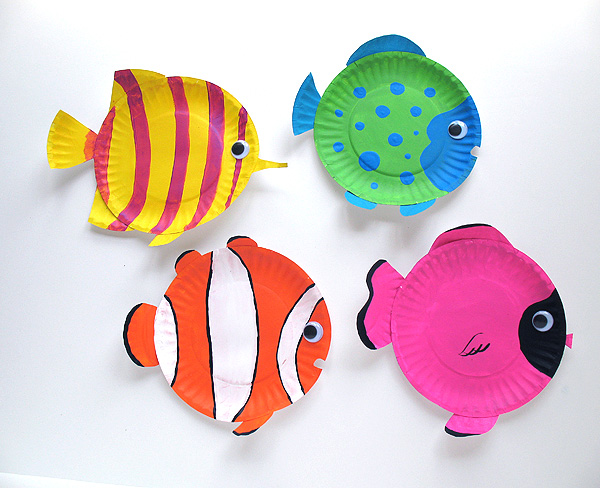
I remember going to the doctor’s office when I was a kid and staring in wonderment at all the beautiful fish in their salt water fish tank. I would go home and draw fish and color them with bright, pretty colors, just like in the aquarium. Now, you and your kids can make your own salt water fish using miniature paper plates and brightly colored paints! These look great hanging on the wall!
Supplies for paper plate fish:
- 8 miniature paper plates
- brightly colored acrylic paints
- paintbrush
- 4 large wiggle eyes
- white craft glue
- glue stick
- scissors
- pattern 1 and pattern 2
You can use any craft paint that you have on hand. I used Americana in the following colors:
- Bright Orange
- Sour Apple (green)
- Turquoise Blue
- Ocean Blue
- Bright Yellow
- Vivid Violet
- Carousel Pink
- Black
- White
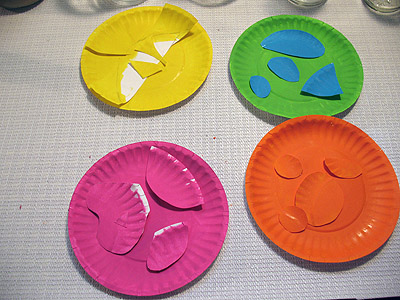
1. For each fish you will need two paper plates. Paint one paper plate pink, one yellow, the third one green and the fourth one orange. While those are drying, trace the patterns onto the other paper plates. Paint the pattern pieces the appropriate colors and let dry.

2. Cut the painted fish pieces out, you should be able to see your pencil lines through the paint.
3. Use a glue stick to attach the fish pieces to the appropriate plates, gluing the pieces to the back.
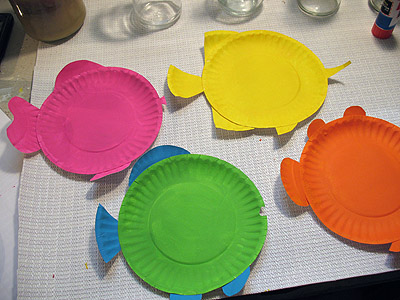
4. Use paint to add stripes or polka dots, decorate them however you like. Use white craft glue to attach wiggle eye.
Hang on your child’s bedroom wall for an instant no maintenance aquarium!
VARIATION: Hang from the ceiling
If you prefer to hang these from the ceiling there are a few adjustments that need to be made. You could hang them as constructed above, but the back of your fish won’t be pretty, it will be unpainted plate with glued on pieces. When hanging from the ceiling these fish will undoubtedly twirl, so to make them visually pleasing on both sides make the following adjustments:
- For each fish body paint TWO plates instead of one and paint the backsides of the plates instead of the front
- Paint both side of all the fins, tails and lips.
- You will need TWO wiggle eyes for each fish instead of one.
- Glue the fins and tails to one of the plates (the unpainted side), and add a long piece of string.
- Sandwich the two painted plates together, painted sides facing outward.


These are adorable! Thanks so much for sharing! Our girl scout troop is going to use these fish for their craft when we visit the Ronald McDonald House. Do you have a template or pattern for how you paint each fish? I found the templates for the fins, tails, etc. but couldn’t find the template to trace/pencil the plates. Thanks so much!
Love it! Theses are bright and easy for my Pre-K special needs kids!
super creative such a good idea for making things like this
Amanda, sou do BRASIL, e amei esses peixinhos. Fáceis de fazer, e as crianças vão amar fazer!
Obrigada por compartilhar!
bright and colorful. Nice idea.
too good !
Great idea! And so colorful and fun! Thanks for sharing your information. I plan to use it to decorate for my daughter’s Under The Sea party! :)
SO excited! I’m doing an underwater themed party for my 2 year old and these will be PERFECT additions to the decor :)
Haha it’s super!! Thank You very much :))))
Best regards from Poland :))
Thanks for all your great comments everyone!
i am a teacher and we are going to present a puppet show “Flipi, the little fish, and the missing water” with my class. we are going to use this lovely idea for our decor! thanks a lot!!
LOVE IT !!!! I am going to use this idea for summer camp theme– Under the Sea
I love those! That’s such a cute craft!
What a great kid craft!
Seriously awesome!!
There have been a couple of suggestions to hang these from the ceiling. Because they will twirl (which would be very cute!), the back sides will show. Therefore I have updated the post to add some directions for two sided fish. :) Have fun!
Super cute. Love the idea of hanging them from the ceiling.
Thanks everyone! I had so many different ideas swirling around in my head for these, the colors and possibilities are endless!
Truly adorable!
The bright colors are wonderful! I would love to hang them from the ceiling in my son’s room.
I love the idea of hanging them from a ceiling! Great thinking!
So darling, Amanda. These are too fun!
LOVE this!! We’re staring our Ocean unit in my kindergarten classroom this week and I will definitely be making some version of this in the next few weeks! Thanks for sharing.