Summer Camp guest post by Steph of Modern Parent Messy Kids
The God’s Eye is a quintessential summertime project. Whenever I see one it sends me straight back to my childhood summers spent at Camp Roganunda crafting and exploring nature. I love the idea of passing down this tradition to today’s generation. And while we’re at it – why not spice things up a little?
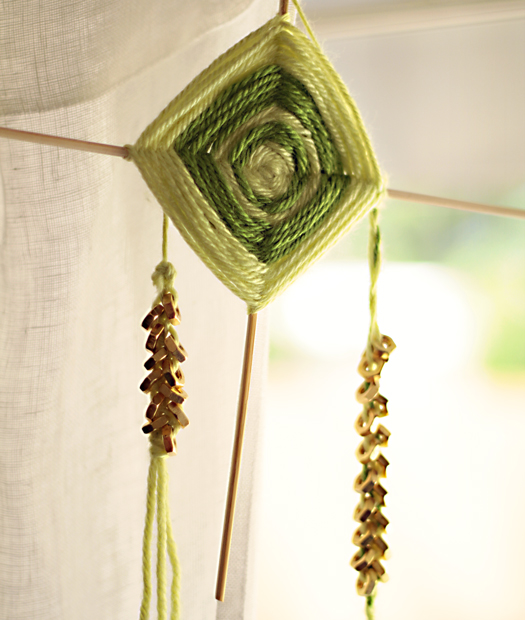
Girls will especially love this updated God’s Eye because, let’s face it, we girls like shiny things. My bet is they’ll also find the unexpected use of brass hex nuts to be pretty cool. So, without further ado, I give you my modern take on the classic God’s Eye.
Supplies for God’s Eye:
- yarn, preferably 2 colors
- 2 sticks, or pencils or chopsticks
- 20-30 small brass hex nut
- scissors
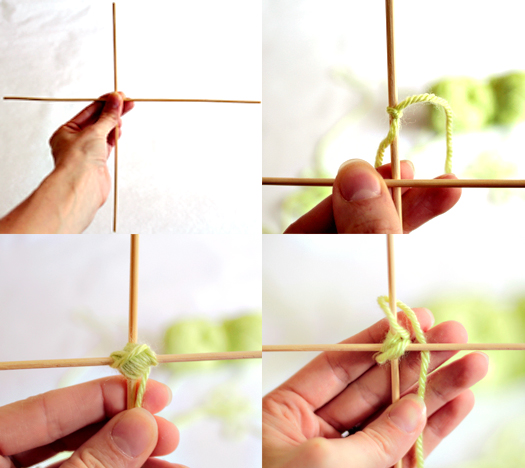
Start with two sticks/pencils/chopsticks/etc. (I used bamboo skewers with the sharp tips cut off).
Arrange the sticks in the shape of a cross and tie a piece of yarn around the top.
Wrap the yarn around the two sticks in the shape of an “x” several times.
Once your sticks are fairly secure, loop the yarn around the top stick once.
Moving counter-clockwise, pull the yarn to the next stick and loop around once.
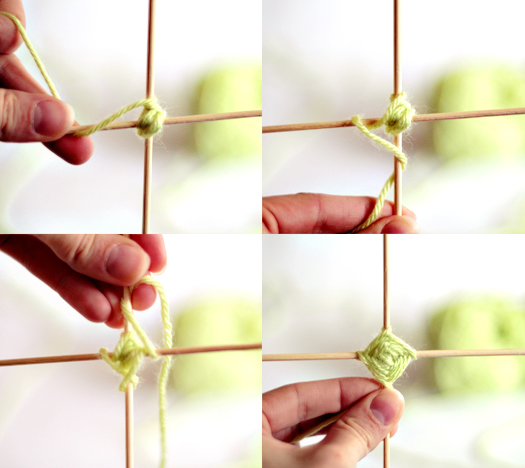
Repeat on the remaining sticks until you return to the top.
Continue wrapping the yarn around the sticks in this manner until you’re ready to switch colors.
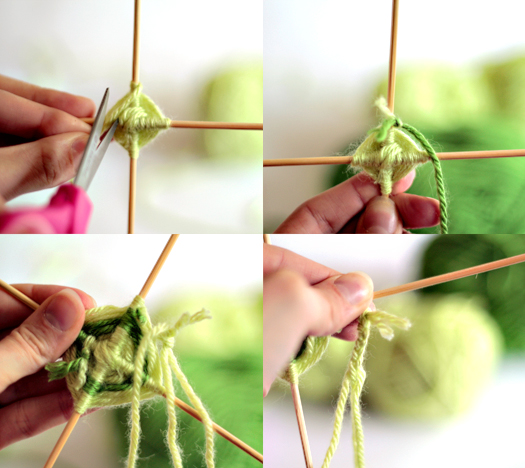
To switch colors, simply cut the yarn and tie the end to your new yarn. Be careful to place the knot on the backside of the God’s Eye. Alternate as many colors as often as you wish.
It’s time to add the decorative strands when your piece is around 3/4 of the size you want it to be.
Pull out an extra inch or two of yarn and attach two separate pieces with a knot. (Tip: the next part will be easier if you use different colors for your three yarn strands.)
Begin braiding the three strands.
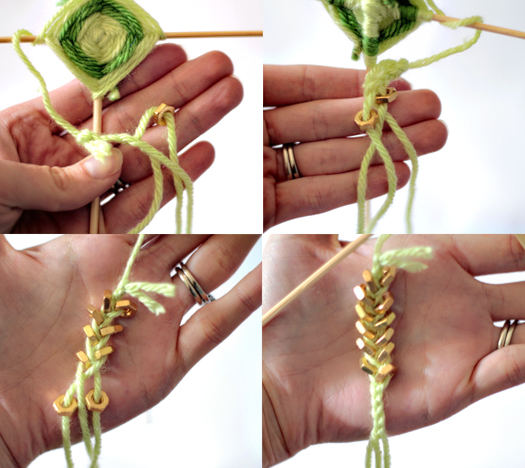
Now for the fun part – the bling! Add a small brass hex nut to your right strand and bring it to the middle.
Next add a hex nut to the left strand and bring it to the middle.
Continue braiding like this until you’ve added as many hex nuts as you’d like (I did 12 on one strand and 18 on the other).
Finish up with a bit more braiding and a knot to keep everything secure.
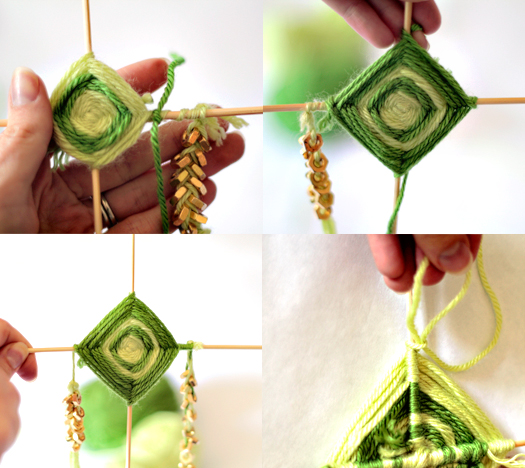
Wrap the braid around your stick until it hangs at the height you want. Then tie on your next color.
Repeatedly loop the yarn around all four sticks as you did before.
Repeat the process to add another decorative strand on the opposite side.
Add a few more layers on your God’s Eye to cover the strands. Finish up by knotting one more piece of yarn around the top, but don’t pull it all the way through. This will form a loop to hang your piece by.
That’s it! Hang it in a window, in front of a mirror, or over a bed to add some sparkle and style to your kid space.
I hope you enjoyed this tutorial. If you’re looking for more ways to be creative this summer, be sure to check out my DIY Creativity Center over at Modern Parents Messy Kids. Also, don’t miss my round up of modern DIY bracelets (which includes a piece that inspired this very project) and my DIY Sensory Veggie Garden. Thanks again so much to Marie and all of you for having me!

 Steph is mom to a two year old boy and a one year old girl. She’s out to prove that modern parents and active kids can successfully coexist. Modern Parents Messy Kids is a lifestyle and design blog providing usable information on enriching play activities, arts and crafts, parenting, child development, family products, and kid-friendly design.


I remember these! I used to make them as a child too. Thanks for taking me down memory lane :)
Great tutorial.
I like your twist taking this quintessential camp project and then adding the the hex nuts. Pretty and fun!