If you’re looking for a really fun and creative project for your home, then you’ll love these recycled-upcycled DIY Ombre Napkins! This tutorial helps give life back to your older or starting-to-stain cloth napkins, while being super on trend with beautiful new color. Follow our how-to instructions to make a set for yourself! Whether you have cloth napkins to repurpose already or if you’re out thrifting, this is the DIY project for you!

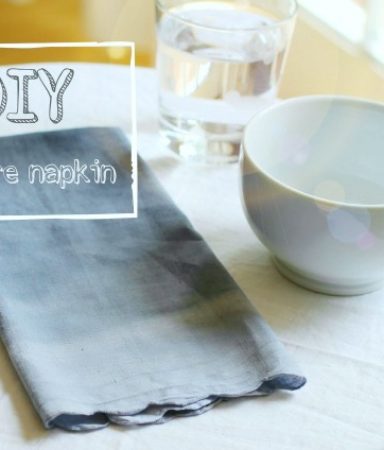
How-to: DIY Ombre Napkins
We stopped using paper napkins in my home about 8 years ago. Both my husband and I felt like it was not only a “greener” move but also, cloth napkins work so much better. Plus, they are prettier too… especially with our DIY Ombre Napkins tutorial!
Sometimes though, my napkins (as they are getting a little older) start to look a little sad. A cool, quick and easy “facelift” for them is to dye them in ombre style. I chose a mellow-looking “charcoal” look for this particular napkin (I actually used black dye) but you can use any color you want or even refresh a set of napkins in rainbow colors!

DIY Ombre Napkins
Supplies:
- box of Rit dye (we used black)
- large tub-like container for water
- rubber gloves
- light (preferably white or off-white) colored napkin

Instructions:
Step 1
Follow the instructions inside the box of your Rit and fill a container full of hot water. Add your powdered dye (proportions of water to dye depending upon how much you need will be given on the inside of the box) I eyeballed the amount of water and added the entire contents of the box.

Step 2
Unfold your napkin, hold it in both hands kind of taught and begin dipping it into the hot water filled with dye. Dip a section and hold for about a minute. Dip a little deeper, another section and hold 30 seconds. Dip again and hold 15 seconds and so on until you reach the end of the napkin. Barely dip the end inside the dye then remove. You’ll have created an ombre style dying pattern. Note: there are many tutorials online that are more labor intensive and specific than this one, but if you are dying a bunch of napkins, this is an easy tutorial to follow.

Step 3
Rinse your napkin holding the lightest color section at the top. Hang outside to dry then launder your napkin before use.

Great job! You are finished and the possibilities are endless for this project. Have fun!
*Originally posted 8/23/13


These are great! I love cloth napkins and these are just perfect!
Beautiful! We do not use paper towels either and this always shocks people when they come over. Cloth is such a great alternative and adds a touch of class to your meal.
These are so great! I love playing with fabric dye!
Anne, thank you SO much. Just now seeing your comment here but I saw the link on Craft Gossip earlier!
And Kate, I LOVE that idea! I think doing this on a larger scale would be totally cool!
I love this! I have a dropcloth turned tablecloth that I might do this with if I feel extra motivated to do a large (sizewise) project someday.
We use cloth napkins almost exclusively at our house! We pick them up at yard sales and estate sale, so by the time we get them they’ve already got some where (and often slight staining) on them. Great idea to revamp them!! I’ve linked to your tutorial on Craft Gossip:
http://sewing.craftgossip.com/tutorial-dip-dye-ombre-your-fabric-napkins/2013/07/24/
–Anne
awesome! what a smart idea! where did/do you get your cloth napkins? or do you just buy fabric & DIY them (if so, what type of fabric works best)? thanks!
Hi Dani! I used just plain, cotton napkins that I bought at a thrift store–they are solid white in color. I’ve also made my own napkins from vintage bedsheets and from old linen tablecloths. I would say any type of natural fiber: cotton, linen, muslin would work best for dying!