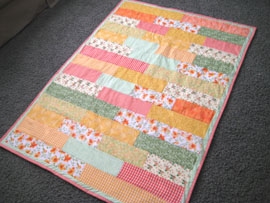
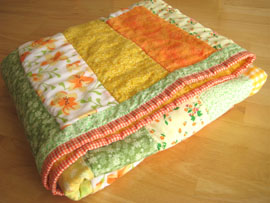
It’s finished! I am done with the quilt that I started almost a month ago. Here were the quilt colors from a previous post. Now they are put all together in a fun pattern that was easy and fun. I love it and think it turned out great, all vintage looking. I am naming it “Here Comes the Sun” as I am hoping it melts the snow outside my house.
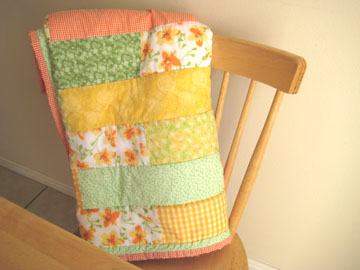
Here Comes the Sun Quilt
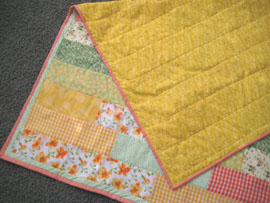
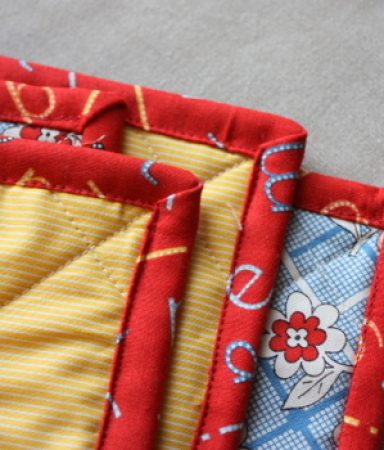
I am still getting this whole quilting thing down. I learned I am impatient and press the sewing foot too fast with my lead foot, so some of my sewing lines are squiggly. I looked to Crazy Mom Quilts for attaching the back with the middle and the top. I don’t have wood floors, so I pinned mine to the carpet and then pinned it all throughout. Also, I was a little rusty on finishing the binding, so I looked up these great websites for help: Kelly Mccaleb, Expert Village. Here are pictures of the pinning, of the quilt all done, and what the back looks like. I machine quilted across every line horizontally.

Things I love about this sun quilt:
- It cost me $14 for the whole thing, top, batting, and backing. Good ol’ Walmart fabric. Perfect for practicing my quilting.
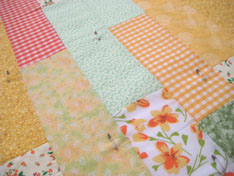
- The rectangles are long and fairly wide at 4 inches each, so it was fast to patch together.
- It is not a squares patch quilt, so I didn’t have to match any seams together, stretching the fabric until each line matched up. Yeah!
- I used my machine for every part of the sewing. It made it very easy. Normally I have at least hand-sewn the binding, but I wanted to test the machine out on that. I think the binding turned out great and when I need to finish a quilt fast, I will do it again next time.
- I sewed a little sun in the corner of the quilt to remind me of its sunny purpose.
Things I don’t like about this quilt:
- I should have used a little less green and emphasized the yellows more.
- Some of the fabric was not cotton, rayon or something, and one piece melted from my hot iron.
- Next time, I will try to use quilt frames my Mom has to attach it all together tighter. But I do love this washed look, all wrinkly and vintage looking.
My next quilts are for my kids. I have left over I Spy fabric and I am making them smaller versions to play with in the car. I will post them when I have the Mini I Spy’s done.


Your work is inspirational! I love the names you give your quilts. I just made my first quilt. It was made with black and white fabrics with accents of raspberry pink. I began with quite a bit of fear. But each step I completed just brought it to a more exciting stage. I think I’ll keep doing it! And I can’t wait for my new little granddaughter to be wrapped up all snuggily in it!
I use big office supply clips to stretch my quilt layers across a work table and pin baste on the table top. It holds the fabric nice and smooth and I don’t have to crawl around on the floor!
I heard of a great idea that I have yet to try but need to! For all of you moms who hate the idea of getting rid of your child’s baby clothes but are stuck with HEAPS of them. . . make them into a quilt :) Cut the patches out of their old clothes and WALLA!!
Thanks so much for featuring Expert Village in your blog post! And your quilt turned out beautifully. Is this the quilting series you used?
http://www.expertvillage.com/video-series/307_quilting-beginner-guide.htm
This quilt is beautiful! Thanks for the inspiration.
Honey, I love the pictures of the quilt. I wish that I had the patience and, I might add, the talent to make a quilt. Brent said the snow was melting today, so I think the name worked :)
Great quilt Marie!! Love the colors including the green!!!
Man, crafty talent must run in your family! You and Meriel amaze me! I love love love your website and thank you for all of your kids ideas! Your Valentines posts really helped me out this year :) Your quilt is beautiful, people would pay big bucks for that!
ah this is just what i need to brighten my days up! its so yellow and happy! you did such a great job marie!! i wish i could do that!
Beth – With the green, that is what I had in mind. I do miss my grass too, just as much as my sun!
Thanks to everyone for great encouraging comments!
I love the colors! So cute. Someday I will be brave enough to try this!
I love it!! So happy and fun. And I really, really love the rectangles. Very cool and different.
I like the green in the quilt. It’s like the grass on a sunny day. The whole thing is just beautiful!
You just amaze me everyday when I look at your blog! You are the best!
My Mom just told me that this quilt looks like a Starburst candy! I love it. They are my favorite treats and they are bright and sweet.
Lina – Thank you and I can’t wait to see your baby quilt!
Andrea – I hope you have left over fabric from your Christmas I Spy’s. Then you too can make little ones. I hope to get them done this week.
Melissa and Samantha – Thanks to both of you for your kind quilting words. It is so much fun to see what the creation you start with will turn out to be like. Very satisfying.
Becky – I will email you a pick of the binding corners. I just sew to one end, stop and cut the thread, then start the thread again on the folded over corner. I didn’t do it continuously, I think it would have left too much sewn thread all over.
Heidi – I can’t wait to see my next ones too! I am getting a little quilt happy and hope to get one of these done each month.
Kimberly – It does brighten up my day. It is a big sunburst and I can see some of the grass under my snow now!
Absolutely LOVE this quilt! Reminds me of the lovely ones my Nanny used to make. I’ve picked up my sewing skills from both her and my mother and I’ve always appreciated beautiful handmade objects. I hope your quilt does indeed bring out the sun for you, because seeing it certainly did brighten up my day! :)
Looking forward to being “swap partners” with you! I never did receive your info from Nicole, so I re-emailed (is that a word?!) this weekend. I’ll check my email this afternoon from home and hopefully, will have all your lovely info then! :)
I LOVE this quilt! You are amazing and if you are just getting started then I can’t WAIT to see your next ones!! =)
It turned out super cute! I am curious as to how you did the corners with the machine. I can usually only do one side of the binding with the machine and end up hand sewing the other side. But I like the idea of not having to hand sew. Maybe send me a pic of the corner please!? :)
I have been reading your blog and being inspired for quite some time, so I guess it’s time to come out of the shadows and comment. :) Thanks for all of your wonderful kids craft ideas!! I have used several and my kids love it! Your quilt is great and once again you motivate me to go do something new and fun! Thanks!
The quilt turned out lovely! Very nice color combos
I love it! You did a great job. I love the long strips. Oh, and you totally inspired me with your i-spy quilts. I made 3 of them for Christmas gifts for my kids, my neices and my nephew. It was the first time I made an actual quilt – I usually do rag quilts. But I wanted to do a panel on the back with a village and train track. So… thanks for the inspiration! I can’t wait to see the mini versions!
Fantastic job, it looks very vintage! I can’t believe how little it cost you. I’m making a baby quilt right now (only my second) so your tips are very useful, thanks.