As with most of us, each year I need to come up with some sort of treat or gift to give to friends, teachers and co-workers. This year I am beyond excited about what we’ve put together…Hot Chocolate on a Stick! They are adorable and the perfect cozy, winter treat!

Hot Chocolate on a Stick
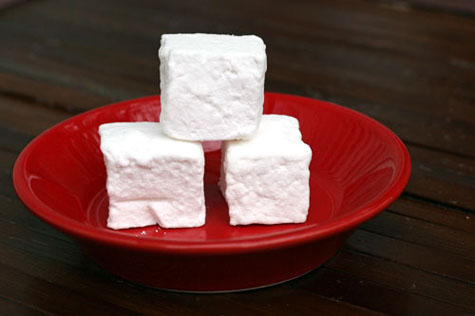
Because I loved the homemade marshmallows so much last December, I wanted to do something that incorporated them again somehow.
Hot Chocolate on a Stick is such a fun idea and I get to use homemade marshmallows! Full confession – this is not my brilliant idea. The recipe is originally from the King Arthur Flour website, and another food blogger whipped them up last year and wrote about it. And, since I’m in confession mode, my sister-in-law Cora is the one who found the links to begin with! Once I saw the recipe, I immediately fell in love and knew these puppies would be the treat for 2010! Wait, puppies are not the treat for 2010. Scratch that.
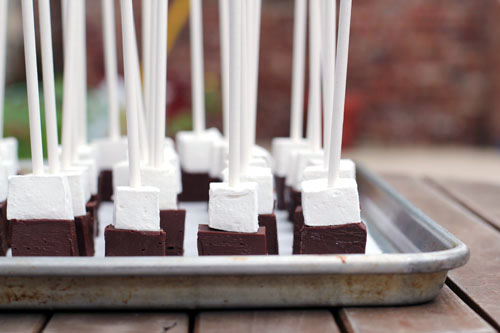
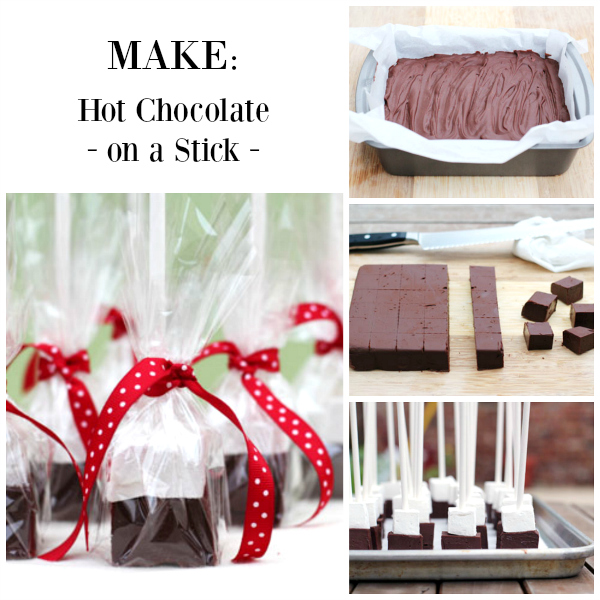
How to: Hot Chocolate Blocks
I followed the marshmallow recipe that I used last year, and used the King Arthur recipe almost directly, with a few small tweaks. Please click here for the marshmallows and continue reading for the hot chocolate blocks.
For planning purposes you should know that the marshmallows have to sit for at least 4 hours before cutting, and the chocolate blocks have to sit for about 12 hours before cutting.
Hot Chocolate Blocks:
From King Arthur Flour
- 1/2 cup heavy cream
- One 14-oz can sweetened condensed milk
- 3 cups semisweet or bittersweet chocolate, chopped or in chips (Jane note: I actually used 1 cup 60% cacao chips, 1 cup semi-sweet chips, and 1 cup milk chocolate chips)
- One 4-oz bar unsweetened chocolate (broken or chopped into smaller pieces)
- Wooden or cookie/lollipop sticks
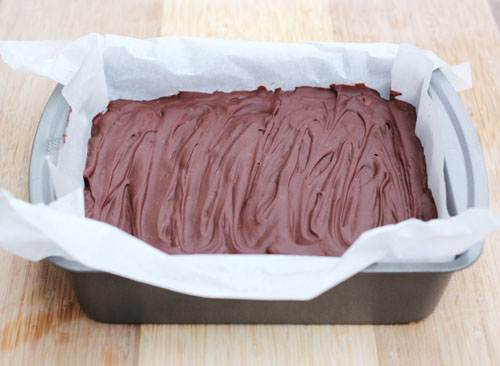
- 8″x8″ pan, lined with parchment paper
Method
Heat the cream and sweetened condensed milk over medium-low heat until it starts steaming, stirring periodically. Remove from heat and add chocolate. Stir and let sit for 10 minutes, then put back on medium-low heat and stir with a whisk until chocolate is completely melted and shiny. (At this point you could add some flavoring…vanilla, hazelnut, peppermint, whatever fits your fancy!)
Pour chocolate into prepared pan and spread chocolate as level as you possibly can. Let sit overnight (12 hours or so).
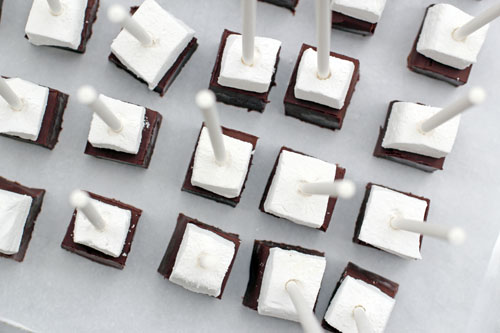
Remove chocolate from pan and cut, top side face down, into squares. Divide the block into sixths each direction, so your squares will be a bit larger than 1″ x 1″. Use a long, thin knife. Heat the knife under hot water, wipe dry with a towel or paper towel, make a few cuts, then repeat the knife-heating procedure. Makes 36 squares, although those corner squares are shaped a little funny…you might just want to eat those straight up while you’re cooking. You need the energy for all this hard work.
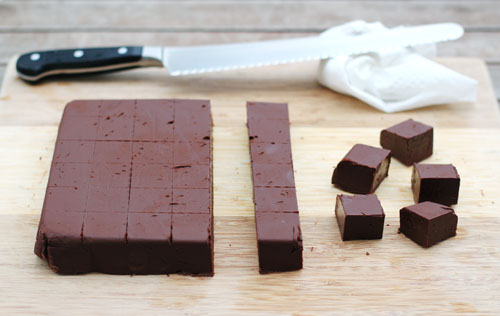
For both the marshmallows and the chocolate squares, feel free to get creative with flavorings and/or rolling them in peppermint pieces, cocoa, etc. I just used a little vanilla in the chocolate and kept it simple. And they are still mighty delicious! One stick is good for about 4 – 8 ounces of hot milk…depending on how chocolatey you like it.
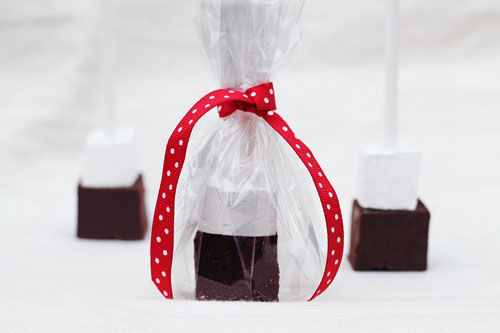
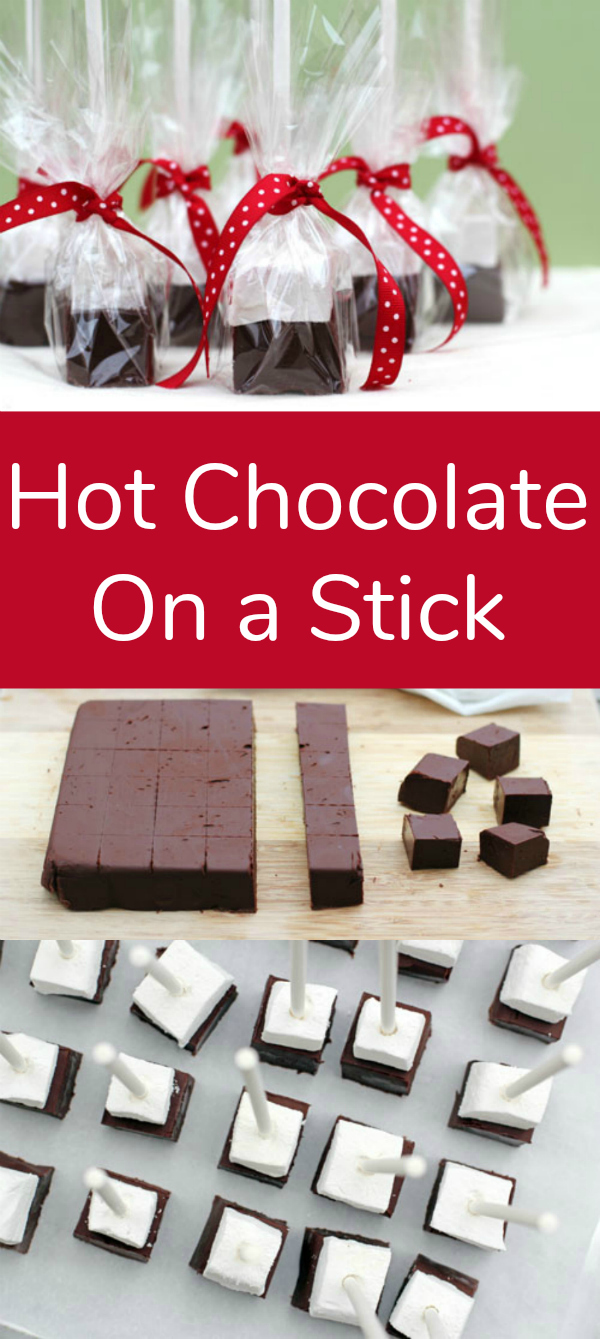
Holiday Packaging
I wrapped each stick in a square of cellophane and tied it with a pretty ribbon. I’m kind of in love with my hot chocolates on sticks.
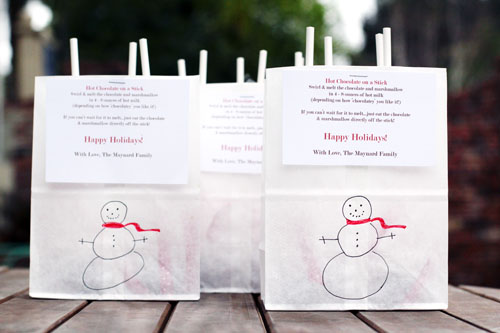
For delivery, I packed the sticks in white lunch bags (I found some at Target) with the tops cut off so that the sticks would poke out the top. I then stapled a simple card printed from my computer with directions for the chocolate. (Click here to download cards you can print and use. Consider it my holiday gift to you!) For a few people I actually drew a snowman on the bag. Then I realized I was going to be drawing snowmen forever and I gave up.
You can fit about 6 sticks in one bag comfortably. Because your hot chocolate wants to be comfortable. Trust me.
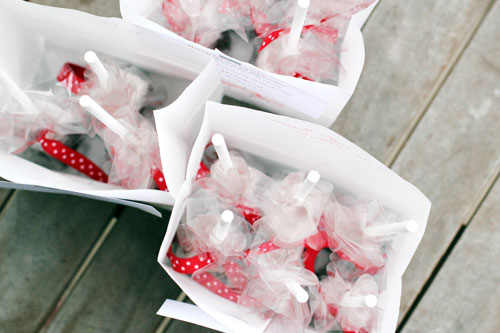
I made three batches of the chocolate blocks and 2 batches of the marshmallows. I was able to make about 100 sticks, with marshmallows leftover.
Also, I made sure to cut the marshmallows a bit smaller than the chocolates, I thought they looked a little cuter and more balanced that way.
For the marshmallows, please visit https://www.makeandtakes.com/homemade-marshmallows-a-fun-holiday-treat for our homemade marshmallows recipe.
- 1/2 cup heavy cream
- 1 14 oz. can sweetened condensed milk
- 3 cups semisweet or bittersweet chocolate chopped or in chips (Jane note: I actually used 1 cup 60% cacao chips, 1 cup semi-sweet chips, and 1 cup milk chocolate chips)
- 1 4 oz. bar unsweetened chocolate broken or chopped into smaller pieces
- Wooden or cookie/lollipop sticks
- "8x8" pan lined with parchment paper
- 36 pre-made Homemade Marshmallows
-
Heat the cream and sweetened condensed milk over medium-low heat until it starts steaming, stirring periodically. Remove from heat and add chocolate. Stir and let sit for 10 minutes, then put back on medium-low heat and stir with a whisk until chocolate is completely melted and shiny. (At this point you could add some flavoring...vanilla, hazelnut, peppermint, whatever fits your fancy!)
-
Pour chocolate into prepared pan and spread chocolate as level as you possibly can. Let sit overnight (12 hours or so).
-
Remove chocolate from pan and cut, top side face down, into squares. Divide the block into sixths each direction, so your squares will be a bit larger than 1" x 1". Use a long, thin knife. Heat the knife under hot water, wipe dry with a towel or paper towel, make a few cuts, then repeat the knife-heating procedure. Makes 36 squares, although those corner squares are shaped a little funny...you might just want to eat those straight up while you're cooking. You need the energy for all this hard work.
-
For both the marshmallows and the chocolate squares, feel free to get creative with flavorings and/or rolling them in peppermint pieces, cocoa, etc. I just used a little vanilla in the chocolate and kept it simple. And they are still mighty delicious! One stick is good for about 4 - 8 ounces of hot milk...depending on how chocolatey you like it.
For planning purposes you should know that the marshmallows have to sit for at least 4 hours before cutting, and the chocolate blocks have to sit for about 12 hours before cutting.
Holiday Packaging: I wrapped each stick in a square of cellophane and tied it with a pretty ribbon. I'm kind of in love with my hot chocolates on sticks. For delivery, I packed the sticks in white lunch bags (I found some at Target) with the tops cut off so that the sticks would poke out the top. I then stapled a simple card printed from my computer with directions for the chocolate. (Click here to download cards you can print and use. Consider it my holiday gift to you!) For a few people I actually drew a snowman on the bag. Then I realized I was going to be drawing snowmen forever and I gave up. You can fit about 6 sticks in one bag comfortably. Because your hot chocolate wants to be comfortable. Trust me. I made three batches of the chocolate blocks and 2 batches of the marshmallows. I was able to make about 100 sticks, with marshmallows leftover. Also, I made sure to cut the marshmallows a bit smaller than the chocolates, I thought they looked a little cuter and more balanced that way.
There you have it! Hot Chocolate on a Stick! Happy Holidays!


I can’t wait to make these! I definitely will send up north for Christmas. Everyone loves Hot Chocolate on a cold day, I hope I can find the Silicone mold ice tray, I think that would make it easier to do.
What a lovely idea, will make it for kids in my little ones school , they will have a blast.
These sound perfect for my son’s bake sale at school. The kids will love it and it looks cute so the moms will love it too! Pinning to make this Friday:)
Hello! Do these need to be stored in the fridge ? Thank you!
I am making these to serve at my outdoor Winter wedding in Australia. They will also be favours at the reception! I’m using Doterra organic essential oils to add some flavours like mint, orange, strawberry and rose! Delicious!
My kids are going to be very happy that I stumbled on this post. This is a great idea. Can’t wait to try it.
They**
I was just wondering how long the last or if the need to be refrigerated or anything like that?
no need to refrigerate and they will probably last about 1-2 weeks, although they do start to dry out after a few days (which doesn’t matter much if you melt them in milk in the end!)
Hi Jane,
I think these Hot Chocolate on a Stick are the cutest little gift for all fall and winter! I just featured the recipe on my blog Sew Creative in my Weekly Inspiration Post on Valentine’s Day Baking. I’d love for you to take a look!
http://www.sewcreativeblog.com/weekly-inspiration-5-valentines-day-baking-recipes/
Best Wishes,
Crystal
Jane,
I am going to try your yummy looking recipe and wonder how much flavoring you add to the recipe for vanilla, hazelnut, peppermint, etc.
thanks,
stephanie
I haven’t added flavoring yet, so I’m not totally sure, but I might start with 1/2 or 1 teaspoon or so – then check the flavor (just stick your finger in and taste!)…the trick will just be getting it so you can taste the flavor but not adding too much liquid, but I don’t think it should be too hard!
I comment when I like a post on a site or I have something
to contribute to the discussion. Usually it is caused by the fire communicated in the article I
looked at. And after this article Hot Chocolate on a Stick |
Make and Takes. I was excited enough to drop
a leave a responsea response :-P I do have 2 questions for you if you don’t mind. Could it be just me or does it look like some of the responses appear like they are left by brain dead visitors? :-P And, if you are writing at additional places, I’d like to
keep up with you. Could you make a list the complete urls of all your public pages like your Facebook page,
twitter feed, or linkedin profile?
Thanks for sharing your thoughts. I truly appreciate your efforts and I will be waiting for your further
post thanks once again.
We made your Hot Chocolate on a Stick for our family Christmas party this year. It was a big hit! This will become a new family tradition.
We used wooden shish kabob skewers and cut the sharp end off with my kitchen shears. We had a ton of them on hand and they worked great.
great idea with the skewers!
glad they were a hit!
Do I refrigerate them while they set or do I keep them on the counter?
ooopps….I should have read the other posts first! Ooooopppsss…can’t wait to start cutting!
try putting the fudge in 1 in silicone ice cube trays, no slicing required
great idea!
I just found your post via pinterest – and now I have my teacher/neighbor gift for the holidays! I’m not brave enough to make the homemade marshmallows, but these look so adorable I can hardly wait to get started. Thank you for posting this!
hello i have a question i seen alot of websites making this but another way making it without the the cream just melting the chocolate and putting it into icecubes so its confusing which is better option for hot chocolate? and sorry for this question if there is leftovers do we put it in the fridge or is it okay leaving it in the kitchen out :) thank you
I made a trial of these this weekend and was AMAZED at how easy they were!!! And my kids loved them!! So, next week I’ll be making about 100 of them for my kids’ classes! =) Thanks for a great, very do-able gift idea!
so glad it went well for you – and good luck with your mass production next week!
How long do these stay fresh? What can I do to make them stay freshest? I want to make these now for Christmas today.
I would probably do it within a week of consumption. it’s like regular fudge – you know how it sort of gets dried out after a few days? that said, if you’re just planning on melting it in milk, it’s not that big of a deal, they just might not melt as quickly? I would say maybe wait until closer to christmas…keep them in an airtight container, that should at least help! :)
These look awesome! Can’t wait to try them for my daugther’s Winter “One” Derland themed birthday in February!
Hi! Do these need to be stored in the fridge ? Thank you!
nope, in fact, I would recommend NOT storing them in the fridge.
enjoy!
These were such a hit at my work last year that it had been requested I make them for our annual food bank fundraiser!!!
yay! so happy to hear that! :)
Hi Jane, another q! Roughly, how long are the sticks you used? Thanks!
no problem, jess! :)
honestly, I’m not sure – they were probably about 6 inches. they weren’t the short ones that they have out there – I think in the end it probably doesn’t matter, but I kind of liked the longer sticks for this.
Hi Jane,
Does the fudge need to go in the fridge to set?
Thank you!
No, you just let it sit out, no fridge. Good luck!
To make these white chocolate does it work the same if I just substitute with white chocolate chips? I don’t know. Thanks!
I am not sure because I have never used white chocolate, but it sounds delicious! I would maybe use baking white chocolate instead of chips, but I think it’s worth a try! sorry I don’t have better info. let us know how it comes out if you try it!
Do you melt them in hot milk or water? Or are they meant to be eaten off the stick?
melt them in hot MILK for sure. there is no milk product in the chocolate, so water would not work.
they are delicious eaten off the stick as well, but then you don’t have hot chocolate! :)
What a great idea! It simplifies things to make them in bars. Love it!
Thanks so much for this recipe! I just tested this recipe for Christmas treats for my daughters’ classes and it actually worked fine using a silicone mold. I did, however, have to let them sit in the fridge for about a day and a half so they would keep their shapes when removed. Thinking about adding a candy cane stick to the mold too… Thanks again!
good to know- thanks so much for commenting!
I saw your blog last year just before christmas. I made them using your tags, and they were a hit! I found tall holiday decorated containers with windows, and six of these fit in beautifully! Nobody could believe that I had made them myself! Looked very professional and tasted even better because they were homemade! I changed the mix of different chocolates a little to suit my taste. My sister gave them as gifts to her co-workers, as did I, as well as friends and family. I mentioned something a few weeks ago as to whether I should make them again this year, and got a resounding YES! Great idea and thank you so much for the recipe! Nothing says love like a gift of time and thoughtfulness!
I’m glad they were such a hit and will continue to be a tradition for you – so fun! thank you for commenting!
These are adorable! I have two questions, how far in advance can you make these (how long will they stay fresh)? And second, do you think sprinkling some crushed candy canes on top of the marshmallows would be a good addition? I can’t wait to make these this winter, my children always make something for our family friends who don’t have family around for the holidays. These will be perfect!
I LOVE these. We are going to make them for my kids as Valentine’s. And place them into heart designed cupcake papers. Cello wrap them & top them with a glitter heart.
I am wondering if you would send me the word document of the printed directions you attached. (so I could remove Happy Holidays & add Happy V)
Thank you SOO much. I am excited to begin this tonight with the kids!
when you sit the chocolate overnight, does it go in the fridge, or just out? thanks!
I don’t ever put it in the fridge – just out works great!
how well do these dissolve?
it dissolves great – the chocolate just melts away in the hot milk! I like to do two sticks or so per cup of milk! :)
YUM!! I substituted Philadelphia Cream for Desserts and Skim Condensed Milk to lower the fat content. Worked a treat! Thanks!!
I just finished packaging these, they were so easy and I love recipes that make a lot, makes it easy to get a lot of gifts done. I used Baker’s unsweetened chocolate, plus semi sweet chips plus some Hershey milk chocolate bar and it set up just fine.
Thanks for such an awesome treat for the neighbors and co-workers! So tasty and surprisingly easy. My only problem was smoothing out the marshmallows cause they were SO sticky! They turned out so yummy and cute, those not as perfectly cut as yours :) I also put too much powdered sugar/cornstarch on top so I really had to dust them off cause I had white stuff everywhere! As for the sticks, I found them at hobby lobby and at Walmart. I also used mostly chips and mine set up perfectly! Thanks again!!
Here’s how mine turned out with store bought marshmallows. It’s all about presentation, right?
http://pinterest.com/pin/63683782200439550/
My cousin made these as favors/treats for my niece’s 1st bday. My daughter and I loved it so much we thought about making them and giving them out to her class. Since I was pressed for time, I decided to use just store bought marshmallows rather than making them from scratch. It was a big hit! Such a clever idea! Loved it! I’m definitely doing this again, and again. :)
I’m doing this for the second year now. I love it!
I just made these to give as teacher gifts this week. @ Audrey: I used chocolate chips, they worked great. Also, I found wooden sticks that are narrower than popsicle sticks at Michaels ,they came in a pack of 75 and cost under $3.00. My daughters and I had such a great time working on this project. I put a picture of my almost finished product on pinterest so you could see the sticks.
Thanks for such a fun idea and the great directions.
http://pinterest.com/pin/215609900880026491/
those sticks would be PERFECT! thank you so much for sharing!!!
I just made some using Hersheys chocolate chips and Bakers unsweetened chocolate. I then read a comment that makes me wonder if they will set up properly. Has any one else used chocolate chips?
I think using chips can just be unpredictable…I would LOVE it if you come back and let us know how they set! maybe we can solve the mystery! ;)
Jane, just wanted to let you know that the popsicle sticks worked perfectly! First batch going out to teachers and coaches today. Thanks for the great idea! Glad I could do such a nice project with my daughter.
yea! I’m so happy they worked! I may actually use them myself when I make these again because, like I mentioned, the sticks will hold up better in the liquid! sweet! :)
I thought about spoons too, and maybe pouring the chocolate into dixie cups instead, and then peeling the cup off once the chocolate has set.
Making these Tommrow ! I can’t wait , I looked everywhere for the sticks. Can’t find them anywhere including the craft stores and the local speciality baking stores. I’m wondering if plastic spoons would work ? Let me know :D
Thanks for the great idea. :D
can’t believe how hard it is to find the sucker sticks for people…where have they all gone? :)
spoons could work! they might be a little big, but worth trying.
I like the popsicle stick idea someone else had, I think those could work really well.
kebob skewers may be another good option, too!
good luck! have fun!
that’s funny – all I thought was, bamboo would work way better than the candy sticks…forgot about the pointy end! :)
I feel like popsicle sticks could work, you would just have to gently work them into the chocolate, so if you can’t find the sticks, I would totally try those – it’s a great idea! and, again, the wood would fare better in the liquid than paper.
good luck!!
Just realized the skewers could be dangerous, especially for kids. Yikes! I’ll keep looking for the candy sticks.
I haven’t found candy sticks yet, but I do have popsicle sticks. Do you think I could use those or would they be too big, causing the chocolate to crack open? I also have bamboo skewers I could use. Thanks for your help! BTW my daughter and I made the marshmallows last night and they turned out great!
These look great!! I would love to make them as favors for my son’s first birthday party this winter but I was wondering if you have an idea how far in advance they could be made since I won’t have much time the night before. Thanks!
you could definitely make them a few days ahead. I think they last probably a week or two. we used them in hot chocolate two weeks after I made them and they melted great, but I wouldn’t have eaten the fudge since it wasn’t quite as soft as the week they were made. hope that helps! :)
I just made these tonight and tested out a cup. In my opinion, the unsweet chocolate kinda ruins them. I would DEFINITELY omit it and substitute either more semi-sweet or milk chocolate. But the homemade marshmallows make the hot chocolate VERY smooth.
How do you suggest I go about getting sprinkles, chopped up peppermint candies, etc. to stick to the bottom half of each square, since the chocolate will be set when I flip the pan over? I want to cover all four sides of each, so lining the bottom of the pan with candy before pouring it in won’t work. I’ve seen chocolate covered spoons dipped in non-perils and candies and it looks so pretty! I want to try that with these. Any suggestions?
As for some people’s chocolate not setting: I’m no chocolatier, but if you use too many chocolate chips, rather than chopped bars, it may not set as well because there’s oil in the chips to retain their shape and glossiness, and once reheated it doesn’t set as well, from what I hear. The lower quality chips may have more issues too. Just a thought!
Would it be possible/tasty to add a tablespoon or so of kahlua or Irish cream to the mix for the adult crowd on my gift list?
I think that would be super tasty! I think it shouldn’t affect the recipe…but if you’re worried about that, cut the cream by a tablespoon so the liquid proportion stays the same…but I kind of think that might not be necessary. play with it and let us know how it goes! :)
I also saw the idea in Real Simple and while searching, found you – this looks so great, I can’t wait to try it! I was wondering if you are supposed to refrigerate overnight, or just leave out at room temperature. Love everything about it, right down to the packaging – thanks for sharing!
hi sheri! I don’t think there’s any need to refrigerate – I never have, and the original recipe on King Arthur just says to wrap them in waxed paper, parchment or plastic wrap to store, with no mention of the fridge. have fun with the project – they are super cute and yummy! :)
could you imagine PUTTING THESE ON CANDY CANES! I am dying! Must start immediately!
seriously, right? such a cute (and tasty) idea!
Love these!!!! I’ll admit, I tried a batch, and I’m guessing I didn’t heat the chocolate long enough as it won’t set up hard enough to cut (I can scoop it with a spoon though!!) Do you whisk/heat it 2nd time around for quite awhile? Maybe a candy thermometer would help me out?? Thanks for any advice.
Again… LOVE IT :)
hi tamara! I’m so sorry that happened! and I honestly don’t know how to answer…I just did what the recipe said and it worked, and honestly I can’t remember how long I whipped/heated that 2nd time around. I’m useless! :) SOOOO…maybe go to the original source and search through the comments to see if anyone else had this problem? and maybe even the folks at king arthur will reply…hopefully! http://www.kingarthurflour.com/recipes/cocoa-blocks-recipe
I know someone already asked…but still I’m still trying to figure out how to get the stick in the already hard chocolate…is it that soft that the stick wouldn’t break or crack the chocolate??
it really is pretty much fudge on a stick…so same consistency. when I put the sticks in, I did it slowly and sometimes sort of had to squeeze the edges to keep it from cracking, but for the most part that wasn’t an issue…it’s just soft enough to get the sticks in!
I made a batch of the hot chocolate on a stick last night. It was super simple, and the clean up was a snap. I wanted to try them for my wedding in February. I used a heart shaped cookie cutter and it was no problem at all. I’m wondering if I can freeze them, and if so, how long do you think they’ll keep?
I’m so glad they came out so well for you – yea!
as for freezing, I never have. I’ve heard of people freezing fudge for a couple months and saying it is fine, so maybe it’s worth testing now – throw some in the freezer and take it out at christmas and see how it goes!
if you do try freezing, I would make sure you put them in an airtight container (ziploc bag, good tupperware), but wrap the fudge in wax paper first, especially to separate the layers, and be sure to give yourself time for thawing.
let us know how it goes!
Mine did ‘t work! Used 1/2 milk Choc chips, 1/2 Belgian semi-sweet, as I’d be giving to kids, and wanted them a bit sweeter.
Followed the instructions, set over night, but the result is gooey and sticky. Tastes delish, but won’t cut into neat squares. I’m guessing the problem is the chocolate, yes? Word to other users, it only works with bitter and un sweetened chocolate!
Hmmmm, JD…I’m thinking you are probably right, it must have been the chocolate. when I made these I did use 1 cup of milk chocolate chips in the mix and it still worked, but maybe it was just enough that it didn’t change how it set? I’m glad it still tasted good, but wish it would have worked! We’ll just blame King Arthur ;)
I saw these for $4 a pop in Real Simple and came looking for a recipe to make for the holidays this year! Thank you!!!
Instead of popsicle sticks, I’ve decided to use different flavors of candy canes (so it’ll make peppermint or cherry, etc. hot chocolate)- just a thought if you want to switch it up a little!
I’ve had this bookmarked since last December in prep for this year! :) How far in advance do you think these could be made?
you are so good to come back for the bookmark!
so, definitely a couple days ahead would be fine. if I remember correctly, after about a week they were definitely getting a little stale-ish/dried out…it’s a lot like fudge, so the shelf life is about the same as regular fudge would be. that said, you just melt it into milk, so if you’re not eating the squares straight up, then it’s not a huge deal if they get a little dry. bottom line – a few days is ideal! :)
OK, thanks for the info. I will probably get my husband on this project because I have a bunch of other DIY going on for the party. :)
thats awesom for this weekend,thanks jane!!!!
Sorry if someone already asked this, but could I pour the mixture into molds (maybe mini muffin tins)?
um…maybe. the consistency is a lot like fudge. I think the tricky part might be getting it out of the molds? I feel like it was just so easy doing the pan because it was super easy to line it, pop the chocolate out and then cut it up…but maybe try one in a mold and see what happens. hope this is helpful at all! :)
such a fun idea! linked to it here: http://dollarstoremom.com/2011/03/food-on-a-stick-roundup/
What a great idea! I found this after Christmas had passed but my daughter is having her 9th birthday party at an ice skating rink and we’re going to make these for the favors. My daughter is so excited (so am I)!
Well, I’m not going to try to tackle the homemade marshmallows (I’ll buy those), but the chocolate I think I could handle! I just saw this, so I think I’ll make them for Valentine treats. It’s still snowing A LOT here, and hot chocolate is always good :) Thanks so much for the cute idea.
We made four batches of these after finding the recipe on this site. Every batch turned out perfect. They were decicious, too. We gave them as gifts, and everyone LOVED them. The adults loved them as much as the kids, possibly more! They are great exactly as described, but we tweaked a couple of batches. We put 1/2 tsp. vanilla and 1/2 tsp. peppermint extract in some. The ones with peppermint, we put crushed candycanes on top of the marshmallows. Yummy!
I’m so glad every batch turned out – and I want to try your peppermint version! :)
Just catching up on my blog reading and found these darling little treats! Great ideas! This is definitely going into the file!!
Thanks so much for making and posting these, Jane! I’m so glad they’ve gone over well with you and yours, too. And thanks for the kind words about my post!
We make them quite regularly and we have shipped them from NY to TX successfully. Granted, it was in December, but still… The one note I would share about that is to make sure they’re well padded all around to compensate for any movement. Thanks again!
Do you think these would ship ok ? or would the chocolate melt ?
you know, I think you’d be fine in the winter…the summer might be risky, but now I think the risk of melting is probably pretty low. but…I haven’t ever shipped them, so I’m just guessing! but in terms of resiliency and a good treat for shipping, I think this could be a good one. hope that helps!
star shapes? sandwiches? you guys are awesome – love that you’re all making it and doing such fun things with the idea!!! :)
The kids and I whipped up a double batch, one for family and friends, one for all our neighbors. So simple and easy, but such a special treat. Definitely a keeper recipe! We cut out the marhmellows in little stars and the kids had a wonderful time! Thank you so much for sharing!
I’ve been itching to try this all season, and I finally got to it late on December 23rd! It was a ton of work, but so totally worth it because they are darling and delicious and original!!! We even sliced the fudge in half width-wise, and made a “sandwich” with fudge, marshmallow, fudge! Thanks for a fabulous and fun idea. The kids loved helping to assemble them!
The Germans already have you beat i am afraid. I live in Germany and in our cafes here that is how they always make hot chocolate. But it is an awesome idea .
if this is standard in germany, I need to move there stat!!! :)
These look delicious and the way you packaged them is so cute! I’ll be making these for sure, thank you!
OK- made first batch of homemade marshmellows this year – AMAZING- everyone loves them. But this takes it to another level ENTIRELY!! Wish I saw your idea earlier- maybe for Valentine’s Day. But the homemade marshmellows are completely worth the effort- so do try them
We tried this over the weekend and they turned out great! Thank you so much for the idea!
I love this! I featured it on my site today! Come grab my NEW button – it’s so pretty! :) Hope you have a blessed day!
Amanda
todaystoptwenty.blogspot.com
What do you think the shelf life is for these? Will they last a week? Or more? I would probably eat them in the car on the way home without ever making hot chocolate, but am wondering…
I think probably a week or two. we used them in hot chocolate two weeks after I made them and they melted great, but I wouldn’t have eaten the fudge since it wasn’t quite as soft as the week they were made. hope that helps! :)
What a cute idea. thanks for sharing. I will share this!
Just had to share this with my facebook fan page b/c it is SUCH a cute idea! Thanks so much for the darling post. Love it!
I have a double batch in a huge pan and I’m trying not to dip my head in it. YUMMY! I’m going to guess on how much vanilla to plop in here…
Oh, lord! Skip my question; when I actually started READING the recipe did I see that it calls for an 8×8″ pan. From the photo, I thought it was a loaf pan. Plus, I need my 13×9 for the marshmallows anyway.
Jane: Have you tried doubling the recipe? I wondered if a double batch would set properly if poured in a 13×9″ pan. Any ideas?
I always make my own marshmallows (Martha’s recipe) so these will be lovely together. I may even try skewering them with a candy cane…
you know, I think it would definitely be worth trying to double it in a 13×9 pan – the recipe is so gentle on the chocolate to begin with, I just don’t really see there being any problems, and I think the proportions should be about right. let me know how it goes!! :)
I just cooked up a batch of these for co-worker gifts, and I’m so glad I did! Not only is this totally original and delicious, but it’s so easy to make!! It all comes together like magic, and it slides out of the pot and into the pan SO CLEANLY. Easiest kitchen clean-up I’ve ever done. The biggest challenge is going to be keeping my husband from eating it out of the pan, haha. Thanks for such a great, cute idea! I’ll be pairing them with a trio of shortbreads — sure to be a hit.
this paired with a trio of shortbread? I want to be your co-worker!! :)
so glad it all worked out so well, I love hearing that! yea! :)
This is a life-saver. I realized about an hour ago that I never got gifts for our Sunday School teachers….and tomorrow’s the last one before Christmas. The kids and I made marshmallows this morning…so this is perfect!! Thank you so much! I can’t wait to eat one of the extra’s as well!
Hi Jane
I am so glad I found you this morning! This idea is just what I needed for my Christmas gifts for the kids (and kids at heart) in the family. Thank you so much for sharing these yummy treats.
Jane (artfully graced)
Those are too cute!
Jane – these are terrific. I have already made all my holiday gifts and they are wrapped and delivered. Yet, the wheels are turning and I will figure out someone to make these for! Totally and completely cute!!! Happy Holidays!
Love this idea, Jane…these look amazing! We’re sharing it on our blog today as part of our Christmas Craft Roundup! http://bit.ly/GBPcraftychristmas
This looks awesome! I’m totally gonna try these. Such a great idea.
This is probably a stupid/obvious question but, how do you get the sticks into the chocolate? I cant wait to make these!
no such thing as a stupid q?! :) you just stick ’em in! wait, that’s a stupid answer. ;)
so…you kind of carefully push the marshmallows up the stick, but don’t push too far because there’s no going back.
then, you just gently press the stick into the center of the chocolate. on a few of them I could see it sort of push out on the sides, but it only does it a tiny bit and if you do them the size I indicated, they won’t be too small and you won’t have any cracking.
I did 100 of them without any issues…should be pretty easy, but let me know if you have any other questions! :)
Why can’t you live near me again? I want some of these for Christmas from my Janey May.
Also, puppies would be delicious, thank you.
These are amazing. I wish I hadn’t made my gifts this year, but I’ll definitely be saving this for next year!
Jane, knocked it out of the park with this one! Great idea.
Gorgeous! And delish. :)
Once I saw hot chocolate on a stick I really didn’t think it could get any better – then I saw the charming snowman bags. Thanks for the adorable gift idea!
What a lovely idea, will make it for kids in my little ones school , they will have a blast.
YUM! Love chocolate!
Fabulous idea! I know what I’m doing this weekend.
We made the hot chocolate blocks last year and they were a huge hit. I’ve got the indregients for a double batch waiting. I love the idea of a marshmallow on top.
Ok really can you be my neighbor??
These look adorable! I am wondering how much vanilla you used in the recipe?
What a great idea — I love it! And you do a beautiful job with your product photography to boot!
LOVE these Jane! Just fabulous!
Jane, these are so awesome! I also love the packaging in snowmen bags :)
I already made my gifts for this year, but I’m definitely squirrelling this away for next year. It’s so cute… I hope it doesn’t go mainstream by then!
I’ll be sure to not tell anyone else about them ;)
Not only do these look tasty but they look cute too!
and now I am stealing this from you!! My local grocery store has been selling really big marshmallows so I don’t even have to make them… Each family will get their own bag…
THANKS!! You saved Christmas…
saving christmas. that’s my thing ;) have fun making them!
I love this idea! What a great gift to give the neighbors!