This week we’re going to talk about adding a machine-done binding to finish you project. Next week we’ll finish by talking about hand-done bias-binding. Pick whichever option works best for you!
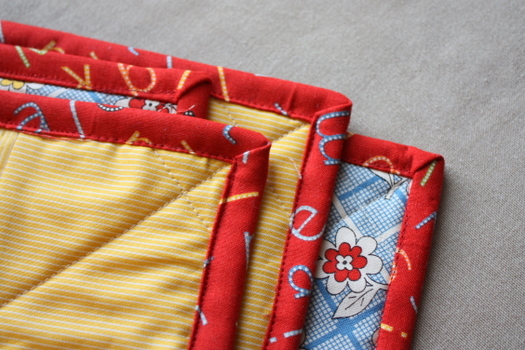
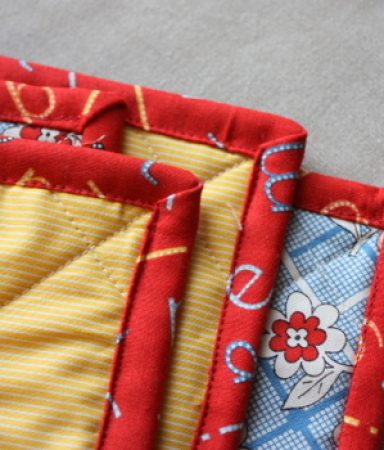
A neat binding makes the quilt look professional, crisp and finished. It can also provide a cute ‘frame’ for the design. When I first started quilting I was so intimidated by the thought of adding a binding to a quilt. I was amazed (and stoked) when I learned how easy they are.
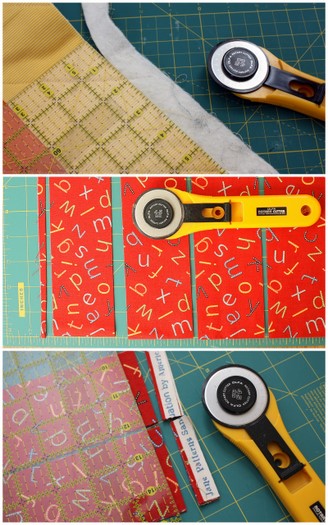
First you are going to trim the excess batting and backing fabric from your quilted project. Use a rotary cutter and your ruler to have a neat, square edge.
Next cut you binding strips: Four 2 ½” wide (x width of the fabric) strips will be just enough to bind your baby quilt. [To find the amount of strips you will need for a bigger quilt, find the measurement of the perimeter of your quilt. Divide that number by 42 – for the roughly 42″ of the width of the fabric – and cut that number of strips. For example: if your quilt measures 55″ x 80″ find the perimeter: 55+55+80+80=270. Divide 270 by 42 = 6.4286. Because the number is bigger than 6 you will need 7 2 ½”x42″ strips to have enough to go all the way around. Does that make sense?]
Trim the selvage edges off you strips.
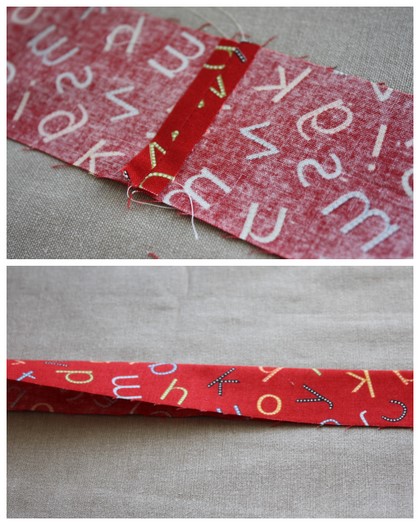
Sew the strips together end to end to create one long strip. Press seams open. Fold strip in half lengthwise and press.
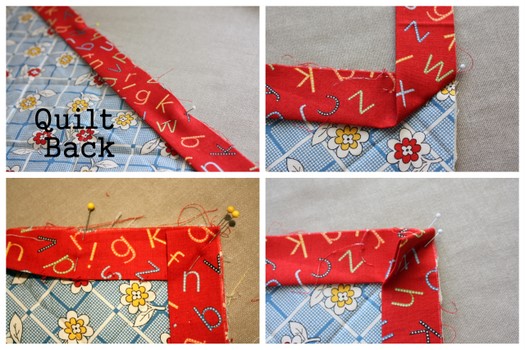
Starting towards the center of one side (you don’t want you ends to join near a corner – makes it a lot trickier) pin the raw edges of your pressed strip to the raw edges of the BACK side of the quilt.
When you get to the corner you are going to miter the corners. To do this fold the strip up at a 45 degree angle when you reach the corner of the quilt. Put a pin in at a 45 degree angle to hold that corner in place. Then fold the strip down to match the raw edges with the next side of the quilt. The fold should line up with the edge of the last side you were pinning to. You will have a little triangle that sticks up – place another pin at a 45 degree angle on the other side of the little triangle flap.
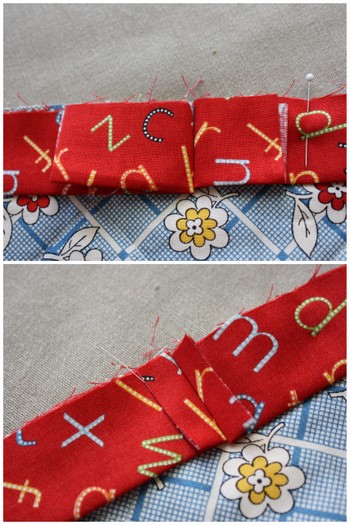
When the strip gets back around to the beginning fold the ends down so that the strips meet-up. Press with your iron to make a crease at both folds. Trim strips to about ¼” away from fold. Pin together and sew seam right on the press marks of both strips. Press seams open and voila – a perfectly joined binding!
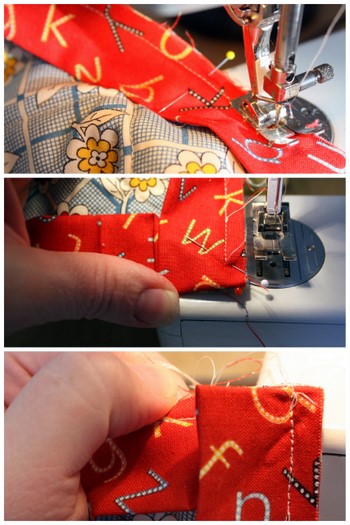
Now sew the binding to the back of the quilt with a ¼” seam allowance. (If you have a walking-foot feature on your machine, I recommend using it here.) When you get to the corner stop your seam about ¼” away from the end of that side. Lift the presser foot and rotate the quilt in the new direction, putting the triangle flap the other direction start sewing from the beginning of that side. (I know this feels strange and confusing at first, but trust me, it works and makes a nice crisp mitered corner!)
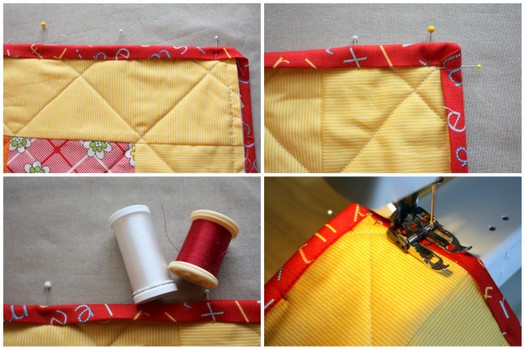
When all four sides are sewn to the back of the quilt, fold the folded edge of the binding to the front of the quilt and pin in place. Mitered corners should fall into place. It’s like magic. Pin abundantly to keep the binding in place in preparation for machine sewing. I would even recommend pressing to help hold that binding in place.
Using either a matching thread or an invisible thread (good if you don’t want your stitching showing as much on the back of the quilt) carefully stitch the binding down working from the FRONT of the quilt. Carefully pivot the needle when you get to the corners and continue sewing all the way around the quilt. This is a time I would suggest back-stitching at the start and finish.
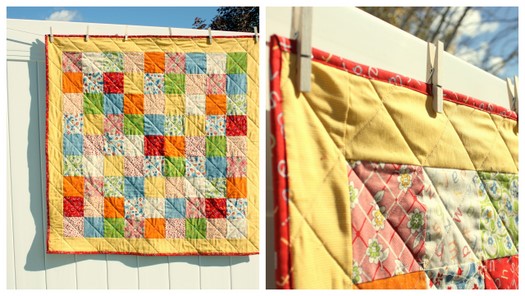
You’re done and you’ve got a crisp, professional looking binding on the edge of your quilt. The double fold layer of fabric will also provide extra durability and longevity to the quilt. The one drawback of putting on a binding with the machine is that it’s difficult to control what the stitching looks like on the back (another reason to use a busy backing fabric.) If you’re not too picky about where the stitches end up on the back, it’s still a great way to finish a binding quickly.
Up Next on our Quilt Along Series: we’ll get a little more advanced discussing other binding methods and quilt washing and care. See you then!
 Amy Smart likes her family, fall, and fish tacos. She blogs about making quilting cool at Diary of a Quilter.


After searching all night for how to make a machine quilt binding, I finally found your blog. SO much easier than anything I read. I was worried about the binding – but it’s true – it’s a breeze! Thanks for making my quilt complete.
This is the best quilt tutorial I have seen so far. I found one before that I used to make my very first quilt and it was good but this one makes more sense and you get more taken care of at one time. I really like that. I’m sharing this with my friends.
This tutorial came at the PERFECT time for me! My sister is due with twin girls and I’m trying to get their quilts done before her baby shower. She lives on the other side of the country so I need enough time to mail the suckers as well. These directions saved me hours of hand-sewing the binding on. THANK YOU!!!
Thanks for the great feedback people!
Sandy – I love the glue tip – I’d heard about elmer’s glue for applique and other projects, but never thought about it for binding. Genius!
Jody – you are so not alone. Mitering those corners is a little tricky the first time. I would suggest making something small – like a hot pad? – and practicing it on something where you haven’t invested a lot of time (or money). A video is a great idea – I’ll see if I can find some tech-y guru to help me. (See, that’s where I am totally inadequate!) Next week I’ll talk about binding a quilt with rounded corners! This might be the trick for you. :)
Elena – I know what you mean about the stitching on the backside. I think the only way to make it catch on the back-side of the binding is to really carefully make sure the front and backside binding widths are identical. But to me, that defeats the purpose of doing it fast. My friend swears by the invisible thread because it doesn’t show so much on the back. And to be honest, this is why I hand bind my quilts – I just like that look and it’s something mindless that I don’t mind doing while I’m watching TV. I’ll share more about that next week.
Thanks so much everyone!
Great tute! Yeah, my biggest issue is how the stitching shows on the back of the quilt. I’d like to figure out how to make it catch on the backside of the binding so it looks nicer. Any thoughts?
I feel like a ditz, but I don’t understand how to do the binding, especially on the corners. I guess I need to see it to understand. People have tried explaining it to me, but I can’t figure it out! *pout*
Jody – Maybe I’ll have to convince Amy to do a little video tutorial about binding, as I know those tricky corners get people confused!
Binding is the fun part of quilting process because I know I’m going to finish a quilt! Thanks for sharing your excellent machine binding tute. I would love to try it soon.
This is so clear, thank you, thank you and thank you. I tried this once and it was a disaster, I really couldn’t figure out how to do the corners. It seems so easy now :)
Thanks again
Pretty quilts. Ditch those pins. Place small dots of elmer’s washable school glue, press and poof no more sticking yourself. I do 4 or 5 quilts up at once then finish them off.
http://sandyquilts.blogspot.com/2008/05/elmers-washable-school-glue-and-quilts.html
Oh, what a great little tip. I’m not a fan of pins, so I might just have to try this!
Your quilt turned out so great. I love the colors. It all came together. And I’m so glad you showed how to bind it using your machine the whole time, on both sides of the binding. I always end up doing that, as I’m short on time!
Thanks, Amy!