For our final week of the Beginning Quit Along Series we are going to talk about another method for binding a quilt and how to care for quilts.
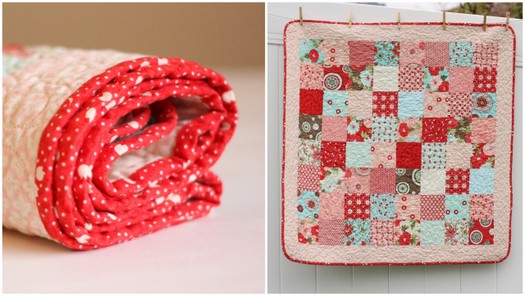
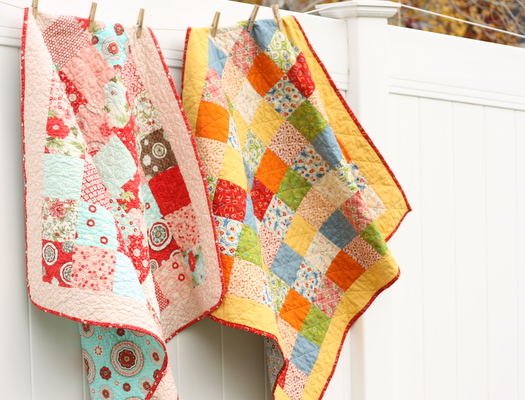
The baby quilt above was made with Charm Packs from the Bliss collection by Moda
Cut a Bias Binding: This binding method is very similar to the one last week. The major difference is that instead of cutting the fabric straight across the grain of the fabric, we are going to cut it on the bias. Cutting something on the bias means to cut diagonally across the grain of the fabric. There are a couple of benefits to cutting binding strips on the bias: stretch in the fabric for going around curves and scallops, and added durability. There are lots of nifty methods for cutting your own bias strips, but I’m going to go with super basic and just cut strip by strip.

First, open your fabric and lay right-side up on the cutting mat. (I am using a ½ yard piece of fabric. That’s more than enough for a baby quilt, but the wider yardage gives me longer strips for less piecing.)
Starting at the bottom left corner (if you are left handed start at the bottom right), find the 45 degree line on your cutting ruler. (Most quilting rulers should have this line.) Line up the 45 degree line along the selvage edge of the fabric. Cut off bottom left-hand triangle. Now turn the ruler parallel with the new bias edge. Line-up the 2 ½” line along the new bias edge and cut your first 2 ½” wide strip.
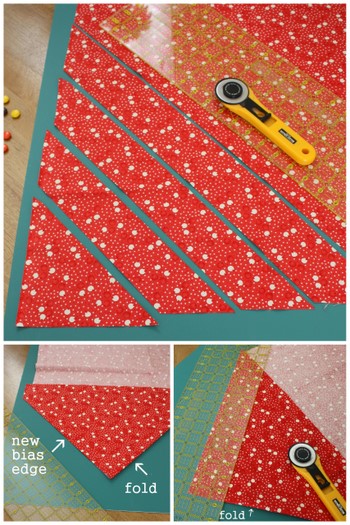
Continue cutting 2 ½” strips. When the fabric gets too long diagonally to cut with your ruler, flip it to wrong-side up and fold the fabric wrong sides together matching up the bias edge. Then you can lay your ruler on top, and continue cutting 2 ½” strips. For this 42″ x 42″ baby quilt I cut 7 bias strips working right from the bottom left hand corner.
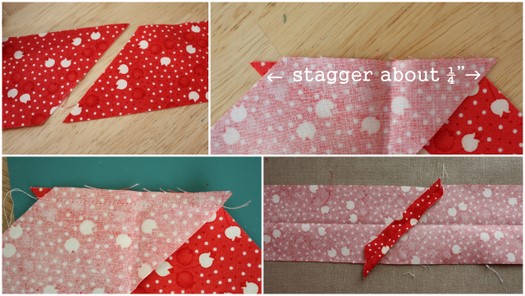
Because they are cut on the bias, these strips will have 45 degree edges. Match strips going opposite directions (top left) and place strips right sides together (they will be perpendicular to each other). Match edges to be sewn and stagger ¼” (see picture). Sew ¼” seam. Press seams open. (These diagonal seams will create a lot less bulk than the straight seams we used last time.)
This next step is totally optional – I’m going to show you how to round your edges.
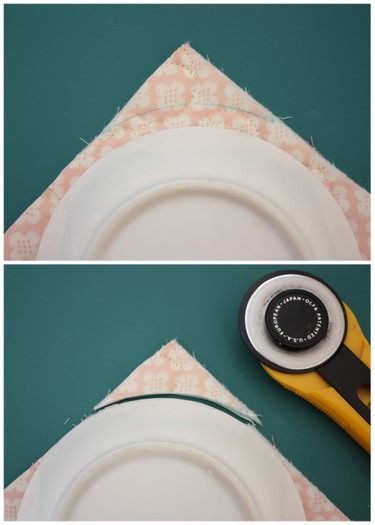
For some of you who are a little wary of mitered corners, this may be a good option for you. :) This will only work with bias strips because they have some stretch! Using a small plate (or some other circle) mark a gentle curve at each corner of your quilt. I like to use the plate itself as my guide for trimming the corner.
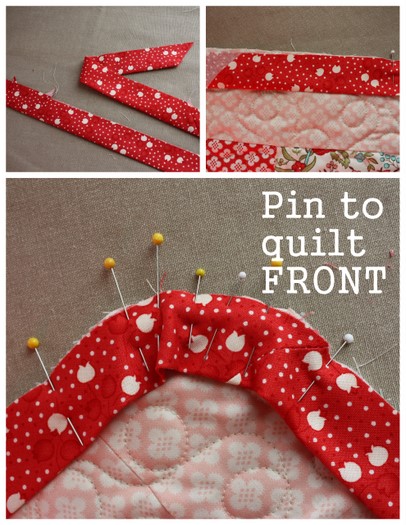
Press bias strip in half. (The pressed fold creates a nice, straight edge that is easily blind-stitched to the backing.)
Hand Finished Binding: pin the raw edges of binding to the raw edges of the quilt FRONT. When you get to the curved corner, carefully pin the edges around the curve. (I obviously like a lot of pins here to hold it in place.) You can also miter with the bias binding as we talked about last week.
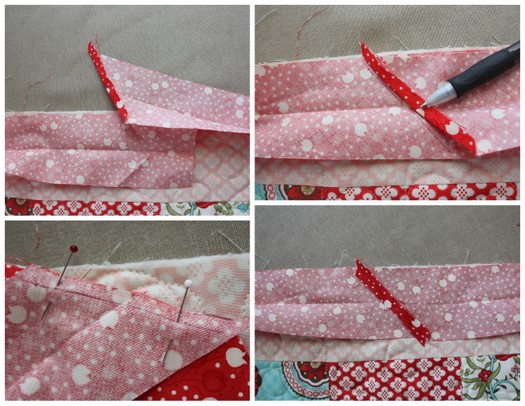
When it’s time for the strips to meet-up fold and press back the start side ¼”, pull the strip taught over the end side of the strip and mark a line. Trim the end side of the strip ¼” past the line. Match up strips and sew on the line. Press open.

Sew binding to the FRONT of the quilt using a ¼” seam allowance. (I recommend a walking foot with the bias binding.) Move carefully around the corners, keeping your seam allowance consistent.

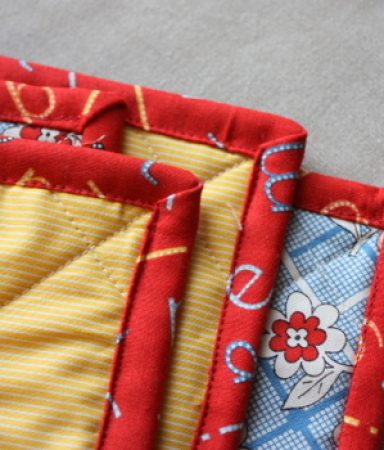
Fold the binding to the back side of the quilt and pin in place. Using a matching thread knot one end and hide it under where the binding will cover. Coming through the very bottom edge of the binding’s folded edge slip the needle through the quilt back, slide it through the layers of the quilt, coming up at the edge of the binding fold about ¼” away. Repeat the process tacking down the binding edge with this blind stitch.
Even thought it takes more time than machine binding, I like this method of finishing a quilt best because all stitching is hidden. You can do the same with straight-cut binding strips as well. It’s a great project to do while just watching TV and you’ll be surprised how fast it goes.
Washing quilts: I LOVE to wash my quilts right when they’re finished – especially if they’ve been machine quilted – because it softens them up a lot and gives them more of a crinkly, antiqued look.
If you’ve used Cotton batting, the batting will shrink a little adding to the puckered feel. I usually wash my quilts in cool water on a gentle cycle with a small amount of detergent and dry them in the dryer on low. The first time you wash a quilt, throw in a Shout Color Catcher (found in your grocery laundry aisle) to catch any dye. Nothing worse than dye running through a finished quilt. If you’ve used high-quality quilting fabrics, you shouldn’t have this problem. If you buy fabrics at the big box fabric stores, or if you’re using a lot of solid reds or blacks, I would pre-wash the fabrics before you make the quilt. If it’s too late for that now, use the Color Catcher and don’t let the wet quilt sit in the washing machine. Check for any dye running before you put it in the dryer.
We’re done!
Thanks again for having me, Marie! I hope this has been helpful to anyone who’s wanted to try their hand at making a quilt! (And if you’d rather just buy one ready made, both of these quilts are available in my shop!)If you want to try some more quilt patterns and blocks – both simple and more advanced – come visit me at Diary of a Quilter. I’d love to hang out more!
 Amy Smart likes her family, fall, and fish tacos. She blogs about making quilting cool at Diary of a Quilter.


Thank you so much for this series! I can see it took a lot of work to do the project AND the blogging. Fantastic for a new quilter like myself. Thanks again! :)
Thanks so much for hosting this series! It’s been so informative and basic. I’m a pretty good seamstress, but I’ve never quilted and always been scared of the quilting and binding part. No longer!! I can’t wait to make my first quilt….some day….when I have time.
I have been loving this series. I have made a few quilts (VERY simple ones) and just kind of figured it out as I went. I think I might have the knowledge and confidence to try something a little more involved now. Thanks!
I love this step by step. Bias cutting is so tricky, I need all the helpful tips I can get.
I’ve never known how to cut binding on a bias, and never knew the reason why people did it. This was soooo helpful!!
And my favorite part is washing the quilt and seeing how it turns out! I love how both of your quilts turned out. You’re inspiring me to make a small Christmas quilt in the next couple of weeks!
Thank you for your series, I have been saving the posts and am going to use it as a guide as soon as I find out what gender my new baby is.
Marie needs to have you back to blog your fish taco recipe, fish tacos are my fav
Vanessa – make sure to share your quilt when it’s done!! And I’m excited to see what you’re going to be having.
And what are these fish tacos?! I LOVE fish tacos!!